 Hyundai Sonata: Alternator. Repair procedures
Removal and Installation
| 1. |
Disconnect the battery negative terminal first, then the positive
terminal.
|
| 2. |
Remove the VIS (Variable intake system) actuator and valve (A).
|

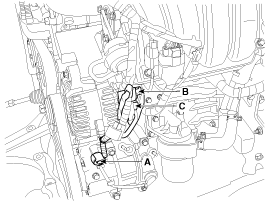
| 3. |
Disconnect the A/C compressor switch connector (A) the alternator
connector (B), and the cable from alternator "B" terminal (C).
|
| 4. |
Remove the drive belt (A) after turning the drive belt tensioner
(B) counterclockwise.
|

| 5. |
Pull out the through bolt and then remove the alternator (A).
|

| 6. |
Installation is the reverse order of removal.
|
Disassembly
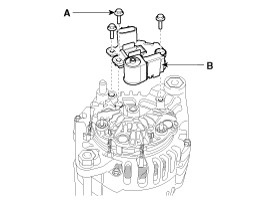
| 1. |
Remove the alternator cover (A) using a screw driver after loosening
the nuts (B).
|

| 2. |
Loosen the mounting bolts (A) and disconnect the brush holder
assembly (B).
|
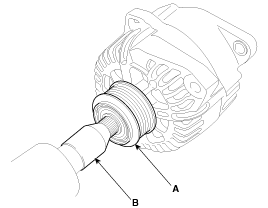
| 3. |
Remove the pulley (A) using the SST (09373-27000) (B).
|
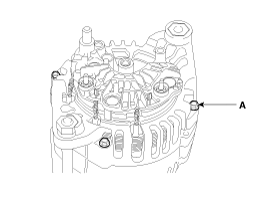
| 4. |
Loosen the 4 through bolts (A).
|
| 5. |
Disconnect the rotor (A) and cover (B).
|

| 6. |
Reassembly is the reverse order of disassembly.
|
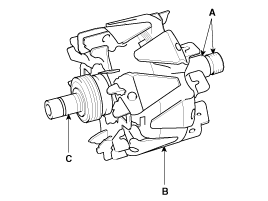
Inspection
| Inspect Rotor |
| 1. |
Check that there is continuity between the slip rings (C).
|
| 2. |
Check that there is no continuity between the slip rings and the
rotor (B) or rotor shaft (A).
|
| 3. |
If the rotor fails either continuity check, replace the alternator.
|
| 1. |
Check that there is continuity between each pair of leads (A).
|

| 2. |
Check that there is no continuity between each lead and the coil
core.
|
| 3. |
If the coil fails either continuity check, replace the alternator.
|
 Alternator. Components and Components Location
Components
1. Pulley
2. Front bracket
3. Front bearing
4. Bearing cover
5. Bearing cover bolt
6. Rotor
7. Rear bearing
8. Rear bracket
9. Through b ...
 Battery. Description and Operation
Description
1.
The maintenance-free battery is, as the name implies, totally
maintenance free and has no removable battery cell caps.
2.
W ...
See also:
Parking Brake Assembly. Repair procedures
Removal
Parking Brake Pedal [Foot type]
1.
Remove the crash pad lower panel. (Refer to the Body group-crash
pad)
2.
Remove the junctio ...
Front Door. Components and Components Location
Components
1. Door module
2. Window glass
3. Outside handle
4. Outside handle cover
5. Door lock assembly
6.Door handle pad
7. Door panel
8. Door chec ...
Limitation of Active ECO operation
If the following conditions occur while Active ECO is operating, the system operation
is limited even though there is no change in the ECO indicator.
When the coolant temperature is low: The sys ...
