 Hyundai Sonata: Power Door Lock Actuators. Repair procedures
Inspection
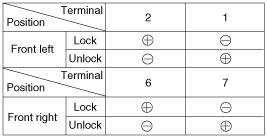
Front Door Lock Actuator Inspection
| 1. |
Remove the front door trim.
(Refer to the BD group - "Front door")
|
| 2. |
Remove the front door module.
|
| 3. |
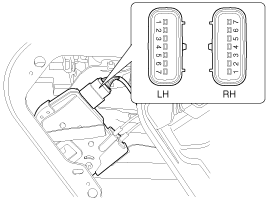
Disconnect the 7P connector from the actuator.
|

| 4. |
Check actuator operation by connecting power and ground according
to the table. To prevent damage to the actuator, apply battery voltage
only momentarily.
|
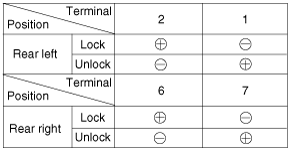
Rear Door Lock Actuator Inspection
| 1. |
Remove the rear door trim.
(Refer to the BD group - "Rear door")
|
| 2. |
Remove the rear door module.
|
| 3. |
Disconnect the 7P connector from the actuator.
|
| 4. |
Check actuator operation by connecting power and ground according
to the table. To prevent damage to the actuator, apply battery voltage
only momentarily.
|
Trunk Lid Release Actuator Inspection
| 1. |
Remove the trunk lid trim panel.
(Refer to the BD group - "Trunk lid")
|
| 2. |
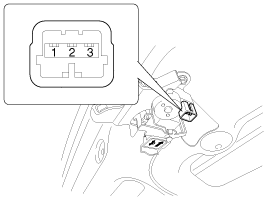
Disconnect the 3P connector from the actuator.
|
| 3. |
Check actuator operation by connecting power and ground according
to the table. To prevent damage to the actuator, apply battery voltage
only momentarily.
|

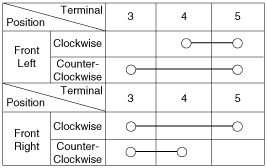
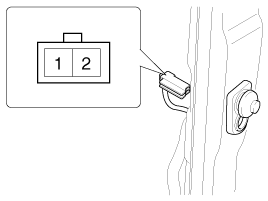
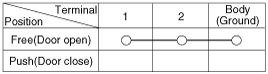
Front Door Lock Switch Inspection
| 1. |
Remove the front door trim panel.
(Refer to the BD group - "Front door")
|
| 2. |
Remove the front door module.
|
| 3. |
Disconnect the 7P connector from the actuator.
|
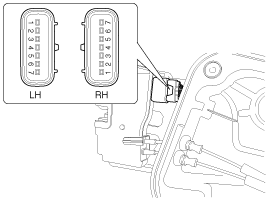
| 4. |
Check for continuity between the terminals in each switch position
when inserting the key into the door according to the table.
|

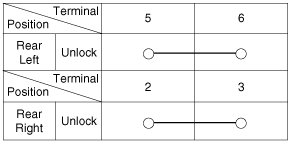
Rear Door Lock Switch Inspection
| 1. |
Remove the rear door trim panel.
(Refer to the BD group - "Rear door")
|
| 2. |
Remove the rear door module.
|
| 3. |
Disconnect the 7P connector from the actuator.
|
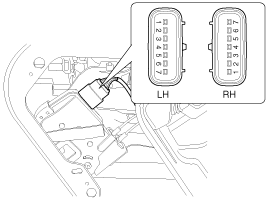
| 4. |
Check for continuity between the terminals in each switch position
according to the table.
|
Trunk Lid Open Switch Inspection
| 1. |
Remove the trunk lid trim.
(Refer to the BD group - "Trunk lid")
|
| 2. |
Disconnect the 3P connector from the actuator.
|
| 3. |
Check for continuity between the terminals in each switch position
according to the table.
|

Door Switch Inspection
Remove the door switch and check for continuity between the terminals.
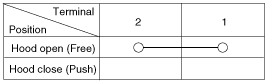
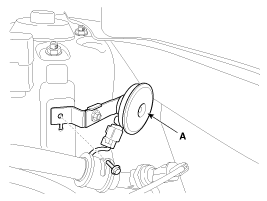
Hood Switch Inspection
| 1. |
Disconnect the connector from the hood switch (A).
|

| 2. |
Check for continuity between the terminals and ground according
to the table.
|
Burglar Horn Inspection
| 1. |
Remove the burglar horn (A) after removing 1 bolt and disconnect
the 2P connector from the burglar horn.
|
| 2. |
Test the burglar horn by connecting battery power to the terminal
1 and ground the terminal 2.
|
| 3. |
The burglar horn should make a sound. If the burglar horn fails
to make a sound replace it.
|
 Components and Components Location
Component Location
1. Driver power window switch
2. Door lock switch
3. BCM (Body Control Module)
4. Front door lock actuator
5. Rear door lock actuator
6. T ...
 Power Door Lock Relay. Repair procedures
Inspection
1.
Disconnect the negative (-) battery terminal.
2.
Remove the junction box.
3.
Check for continuit ...
See also:
Specifications
Specifications
Item
Specification
Master cylinder
Type
Tandem
Cylinder I.D.
22.22mm
Pisto ...
AVN Head Unit. Repair procedures
Removal
AVN Head Unit
•
Take care not to scratch the center fascia panel and related
par ...
Front Wiper Motor. Repair procedures
Removal
1.
Loosen the windshield wiper arm nut (A) after removing a wiper
cap (B).
2.
Remove the windshield wiper arm and blade (A ...
