 Hyundai Sonata: Rear Lower Arm. Repair procedures
Removal
| 1. |
Remove the rear wheel & tire.
|
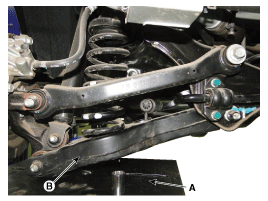
| 2. |
Set up the transmission jack (A) under the lower arm (B).
|
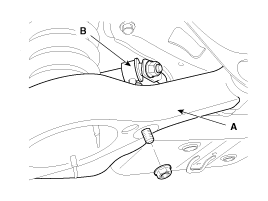
| 3. |
Loosen the nut and then remove the rear stabilizer link(B) with
the rear lower arm(A).
|
| 4. |
Loosen the bolt & nut and then remove the rear lower arm (A) with
the rear axle.
|

| 5. |
Loosen the bolt & nut and then remove the rear lower arm (A) from
the sub frame.
|

Installation
| 1. |
Installation is the reverse of removal.
|
Inspection
| 1. |
Check the bushing for wear and deterioration.
|
| 2. |
Check the rear lower arm for deformation.
|
| 3. |
Check for all bolts and nut.
|
| 4. |
Check the cracks or the cutting of the lower arm.
|
 Rear Upper Arm. Repair procedures
Removal
1.
Remove the rear wheel & tire.
Tightening torque:
88.3 ~ 107.9 N.m (9.0 ~ 11.0 kgf.m, 65.1 ~ 79.6 lb-ft)
...
 Rear Stabilizer Bar. Repair procedures
Replacement
1.
Remove the rear wheel & tire.
Tightening torque:
88.3 ~ 107.9 N.m (9.0 ~ 11.0 kgf.m, 65.1 ~ 79.6 lb-ft)
...
See also:
Closing the hood
1. Before closing the hood, check the following:
All filler caps in engine compartment must be correctly installed.
Gloves, rags or any other combustible material must be removed from the
eng ...
Warning on the LCD screen
Key is not in vehicle
If the smart key is not in the vehicle and if any door is opened or closed with
the engine start/stop button in ACC, ON, or START, the warning illuminates on the
LCD scr ...
Emergency starting
Connect cables in numerical order and disconnect in reverse order.
Jump starting
Jump starting can be dangerous if done incorrectly. Therefore, to avoid harm
to yourself or damage to your vehicl ...
