 Hyundai Sonata: Programming HomeLink
✽ NOTICE
- When programming a garage door opener, it is advised to park the vehicle outside of the garage.
- It is recommended that a new battery be placed in the hand-held transmitter of the device being programmed to HomeLink® for quicker training and accurate transmission of the radiofrequency signal.
- Some vehicles may require the ignition switch to be turned to the second (or "accessories") position for programming and/or operation of HomeLink.
- In the event that there are still programming difficulties or questions after following the programming steps listed below, contact HomeLink® at: www.homelink.com or 1-800-355- 3515.
Programming
To train most devices, follow these instructions:

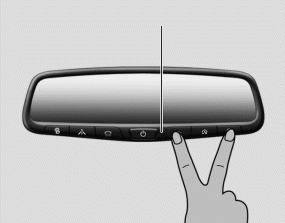
1. For first-time programming, press and hold the two outside buttons ( ),
HomeLink® Channel 1 and Channel 3, until the indicator light begins to flash (after
10 seconds). Release both buttons. Do not hold the buttons for longer than 20 seconds.

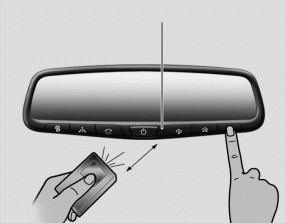
2. Position the end of your hand-held transmitter 1-3 inches (2-8 cm) away from the HomeLink® button you wish to program while keeping the indicator light in view.
3. Simultaneously press and hold both the HomeLink® and hand-held transmitter buttons until the HomeLink® indicator light changes from a slow to a rapid blinking light. Now you may release both the HomeLink® and handheld transmitter buttons.
✽ NOTICE
Some devices may require you to replace this Programming step 3 with procedures noted in the "Gate Operator/Canadian Programming" section. If the HomeLink® indicator light does not change to a rapidly blinking light after performing these steps, contact HomeLink® at www.homelink.com.
4. Firmly press, hold for 5 seconds and release the programmed HomeLink® button up to two separate times to activate the door. If the door does not activate, press and hold the just-trained HomeLink® button and observe the indicator light.
- If the indicator light stays on constantly, programming is complete and your device should activate when the HomeLink® button is pressed and released.
- If the indicator light blinks rapidly for 2 seconds and then turns to a constant light, continue with "Programming" steps 5-7 to complete the programming of a rolling code equipped device (most commonly a garage door opener).
5. At the garage door opener receiver (motor-head unit) in the garage, locate the "leam" or "smart" button. This can usually be found where the hanging antenna wire is attached to the motorhead unit.
6. Firmly press and release the "leam" or "smart" button. (The name and color of the button vary by manufacturer). There are 30 seconds to initiate step 7.
7. Return to the vehicle and firmly press, hold for 2 seconds and release the programmed HomeLink® button. Repeat the "press/hold/release" sequence a second time, and, depending on the brand of the garage door opener (or other rolling code equipped device), repeat this sequence a third time to complete the programming process.
HomeLink® should now activate your rolling code equipped device.
Gate operator & Canadian programming
During programming, your handheld transmitter may automatically stop transmitting. Continue to press the Integrated HomeLink® Wireless Control System button (note steps 2 through 3 in the Programming portion of this document) while you press and re-press ("cycle") your handheld transmitter every two seconds until the frequency signal has been learned. The indicator light will flash slowly and then rapidly after several seconds upon successful training.
Operating HomeLink®
To operate, simply press and release the programmed HomeLink® button. Activation will now occur for the trained device (i.e. garage door opener, gate operator, security system, entry door lock, home/office lighting, etc.). For convenience, the hand-held transmitter of the device may also be used at any time.
Reprogramming a single HomeLink® button
To program a device to HomeLink® using a HomeLink® button previously trained, follow these steps:
1. Press and hold the desired HomeLink® button. DO NOT release the button.
2. The indicator light will begin to flash after 20 seconds. Without releasing the HomeLink® button, proceed with "Programming" step 2.
For questions or comments, contact HomeLink® at www.homelink.com or 1- 800-355-3515.
Erasing HomeLink® buttons
Individual buttons cannot be erased. However, to erase all three programmed buttons:
1. Press and hold the two outer HomeLink® buttons until the indicator light begins to flashafter 10 seconds.
2. Release both buttons. Do not hold for longer than 20 seconds.
The Integrated HomeLink® Wireless Control System is now in the training (learn) mode and can be programmed at any time following the appropriate steps in the Programming sections above.
FCC ID: NZLTLMHL4
IC: 4112A-TLMHL4
This device complies with Part 15 of the FCC Rules.
Operation is subject to the following two conditions:
1. this device may not cause harmful interference, and
2. This device must accept any interference received, including interference that
may cause undesired operation.
CAUTION
The transceiver has been tested and complies with FCC and Industry Canada rules. Changes or modifications not expressly approved by the party responsible for compliance could void the user's authority to operate the device.
NVS┬« is a registered trademark and ZNav Ōäó is a trademark of the Gentex Corporation, Zeeland, Michigan. HomeLink┬« is a registered trademark owned by Johnson Controls, Incorporated, Milwaukee, Wisconsin.
 Compass function
The Compass can be turned ON and OFF and will remember the last state when the
ignition is cycled. To turn the display feature ON/OFF:
1. Press and release the button within 1 second to turn the di ...
 Outside rearview mirror
Be sure to adjust mirror angles before driving.
Your vehicle is equipped with both lefthand and right-hand outside rearview mirrors.
The mirrors can be adjusted remotely with the remote switch. The ...
See also:
Resetting the sunroof
Whenever the vehicle battery is disconnected or discharged, or related fuse is
open, you must reset your sunroof system as follows:
1.Turn the ignition switch to the ON position and close the sunro ...
Engine Coolant Temperature Sensor (ECTS). Description and Operation
Description
Engine Coolant Temperature Sensor (ECTS) is located in the engine coolant
passage of the cylinder head for detecting the engine coolant temperature. The
ECTS uses a thermistor th ...
Automatic climate control system
To defog inside windshield
1. Select desired fan speed.
2. Select desired temperature.
3. Press the defrost button ().
4. The outside (fresh) air position will be selected automatically.
If the ...
