 Hyundai Sonata: Repair procedures
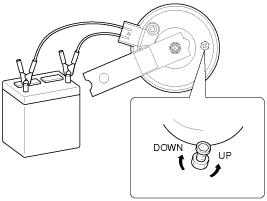
Inspection
Test the horn by connecting battery voltage to the 1 terminal and ground
the 2 terminal.
The horn should make a sound. If the horn fails to make a sound, replace
it.
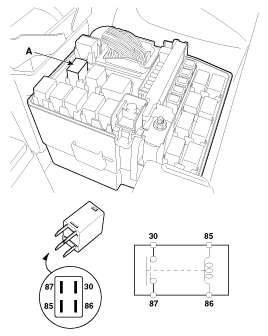
Horn Relay Inspection
| 1. |
Remove the horn relay (A) from the engine room relay box.
|
| 2. |
There should be continuity between the No.30 and No.87 terminals
when power and ground are connected to the No.85 and No.86 terminals.
|
| 3. |
There should be no continuity between the No.30 and No.87 terminals
when power is disconnected.
|

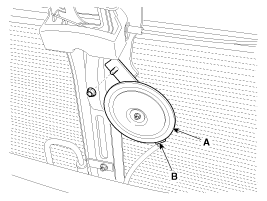
Removal
| 1. |
Remove the front bumper.
(Refer to the BD group - "Front bumper")
|
| 2. |
Remove the mounting nut and disconnect the horn connector (B),
then remove the horn (A).
|
Installation
| 1. |
Connect the horn connector, then reassemble the horn.
|
| 2. |
Reassemble the front bumper.
|
Adjustment
Operate the horn, and adjust the tone to a suitable level by turning the
adjusting screw.
After adjustment, apply a small amount of paint around the screw
head to keep it from loosening.
|
 Components and Components Location
Component Location
1. Horn switch
2. Horn relay (Engine room compartment)
3. Horn
4. Clock spring
...
 AVN System
...
See also:
Battery Sensor. Description and Operation
Description
Vehicles have many control units that use more electricity. These units
control their own system based on information from diverse sensors. It is important
to have a stable power ...
Trailing Arm. Repair procedures
Replacement
1.
Remove the rear wheel & tire.
Tightening torque:
88.3 ~ 107.9 N.m (9.0 ~ 11.0 kgf.m, 65.1 ~ 79.6 lb-ft)
...
Description and Operation
Description
Burglar Alarm System
The burglar alarm system is armed automatically after the doors, hood,
and trunk lid are closed and locked.
The system is set off when any of these ...
