 Hyundai Sonata: Fuel Tank. Repair procedures
Removal
| 1. |
Release the residual pressure in fuel line (Refer to ÔÇťRelease
Residual Pressure in Fuel LineÔÇŁ in this group).
|
| 2. |
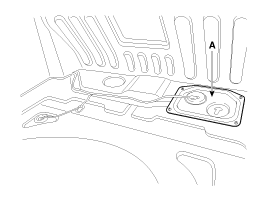
Remove the fuel pump service cover (A) in the trunk.
|
| 3. |
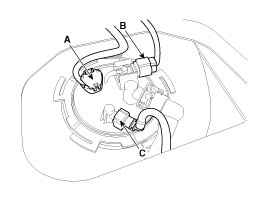
Disconnect the fuel pump connector (A) and the fuel tank pressure
sensor connector (B).
|
| 4. |
Disconnect the fuel feed tube quick connector (C).
|
| 5. |
Lift the vehicle and support the fuel tank with a jack.
|
| 6. |
Remove the center muffler assembly (Refer to ÔÇťIntake And Exhaust
SystemÔÇŁ in EM group).
|
| 7. |
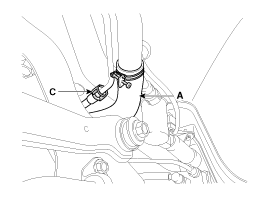
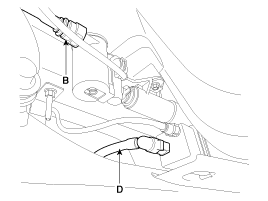
Disconnect the fuel filler hose (A), the ventilation tube quick-connector
(B), and the vapor tube quick-connector (C,D).
|
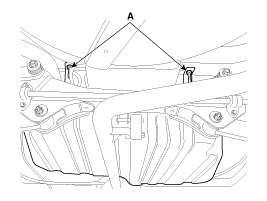
| 8. |
Remove the fuel tank from the vehicle after removing the fuel
tank band installation nut (A).
|
Installation
| 1. |
Installation is reverse of removal.
|
 Repair procedures - Revised
Fuel Pressure Test
1.
Release the residual pressure in fuel line (Refer to ÔÇťRelease
Residual Pressure in Fuel LineÔÇŁ in this group).
...
 Fuel Pump. Repair procedures
Removal
1.
Release the residual pressure in fuel line (Refer to ÔÇťRelease
Residual Pressure in Fuel LineÔÇŁ in this group).
2.
Remove th ...
See also:
Specifications
Specification
Smart Key Unit
Items
Specification
Rated voltage
DC 12V
Operating voltage
DC 9 ~ 16V
O ...
Repair procedures
Inspection
Test the horn by connecting battery voltage to the 1 terminal and ground
the 2 terminal.
The horn should make a sound. If the horn fails to make a sound, replace
it.
Horn ...
Specifications
Specifications
Manual transaxle type
M6GF2
Engine type
Gasoline 2.4 GDI
Gear ratio
1st
3.267
...

