Replacements
Glass Replacement
|
1. |
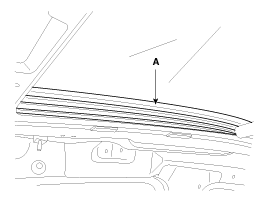
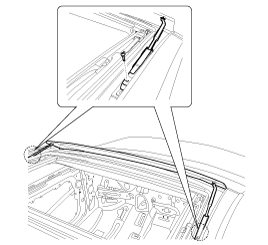
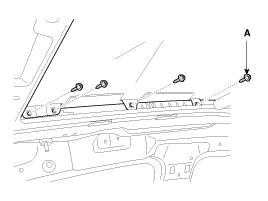
Remove the cover (A).
|
|
2. |
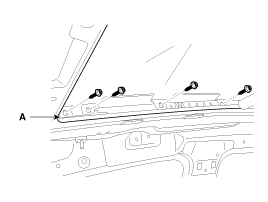
After loosening the mounting screws, then remove the movable glass
(A).
|
• |
Do not damage the screws.
|
|
|
|
3. |
Installation is the reverse of removal.
|
Motor Replacement
| •
|
Confirm the position of guide whether it is closed or
not when you remove the motor.
|
|
|
1. |
Remove the roof trim.
(Refer to the BD group - "Roof Trim")
|
|
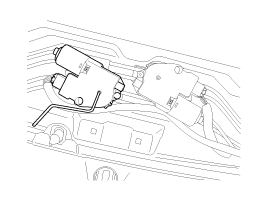
2. |
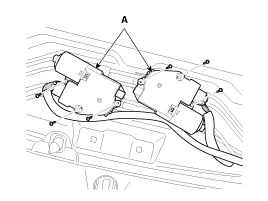
After loosening the mounting screws, then remove the motor (A).
|
|
3. |
Installation is the reverse of removal.
|
• |
Make sure to initialize the motor.
|
|
|
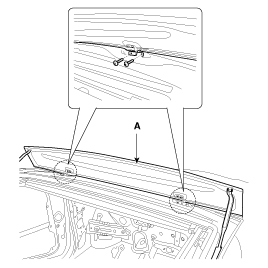
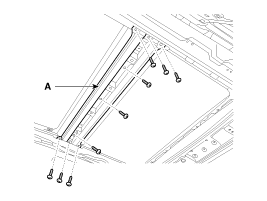
Deflector Replacement
|
2. |
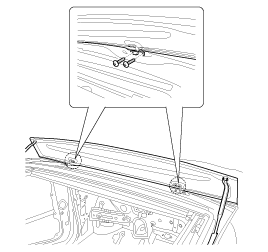
Using a star wrench, the wind deflector (A) loosening the mounting
screw.
|
• |
Do not damage the screws.
|
|
|
|
3. |
After loosening the mounting screws, then remove the wind deflector
(A).
|
|
4. |
Installation is the reverse of removal.
|
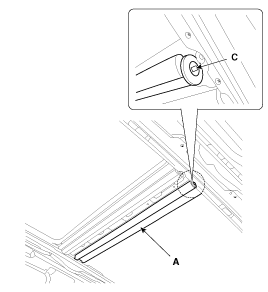
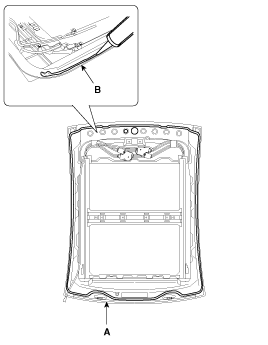
Roll Blind Replacement
|
1. |
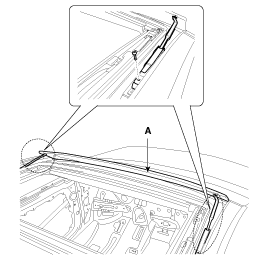
After loosening the mounting screws, then remove the roll blind
lower bracket (A).
|
|
2. |
Remove the roll blind (A) by pulling it at a right angle.
|
• |
When you removing it, be care of that an edge
(C) is dashed against the frame of vehicle because the
roll blind tension looses.
|
|
|
|
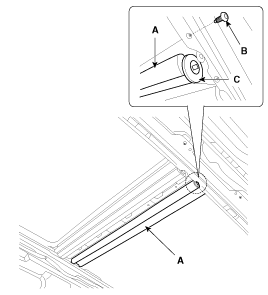
1. |
Installation is the roll blind (A).
|
• |
When you assembly the roll blind bracket, Install
the roll blind by pulling about 15~20cm (5.9055~7.8740
inch) because the screw (B) is dashed aginst the roll
blind.
|
|
• |
When the tension of roll blind is removed, Push
an edge (C), Turn it counterclockwise 19~21, Install
it by removing the push.
|
|
|
|
2. |
Install the screws to the roll blind lower bracket (A).
|
Panoramaroof Assembly Replacement
|
1. |
Remove the following items :
| A. |
Front seat
(Refer to the BD group - "Front Seat")
|
| A. |
Rear seat
(Refer to the BD group - "Rear Seat")
|
| A. |
Interior trim
(Refer to the BD group - "Interior Trim")
|
| A. |
Roof trim
(Refer to the BD group - "Roof Trim")
|
|
• |
To protect the interior, cover the interior before
starting removing the panoramaroof.
|
|
|
|
3. |
Using a star wrench, the wind deflector (A) loosening the mounting
screw.
|
• |
Do not damage the screw.
|
|
|
|
4. |
After loosening the mounting screws, then remove the wind deflector
(A).
|
|
5. |
Close the glass fully.
|
|
6. |
Loosen the panoramaroof mounting nut (A).
Tightening torque :
19.6 ~ 29.4 N.m (2.0 ~ 3.0 kgf.m, 14.5 ~ 21.7lb-ft)
|

|
|
7. |
Disconnect the antenna connector (A) mounting clips (B).
[Front]
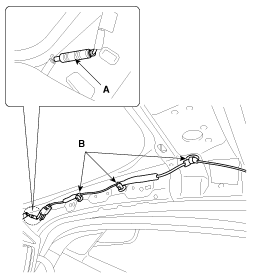
[Rear]
|
|
8. |
Disconnect the connector mounting clip (B).

|
|
9. |
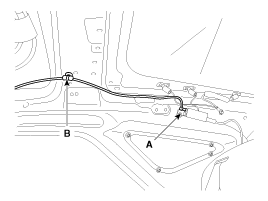
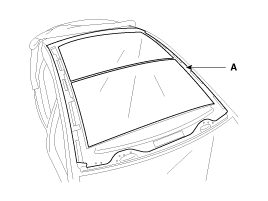
Using a screwdriver or remover, remove the roof molding (A).

|
|
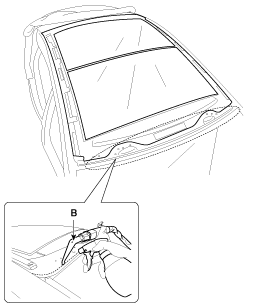
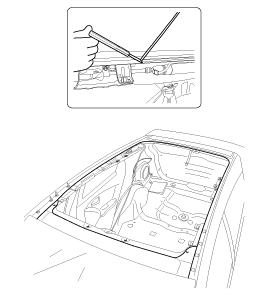
10. |
Open the space between chassis and sunroof using flathead screwdriver,
and then cut the sealant of edge using a tool (09816-2P130) (A).
|
• |
Let the adhesive dry for at least one hour, then
spray water over the roof and check for leaks. If a
leak occurs, let it dry, then seal with sealant :
|
|
|
|
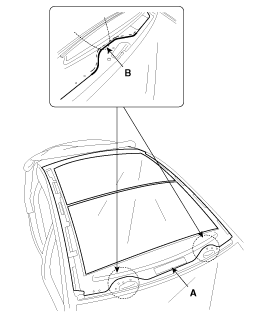
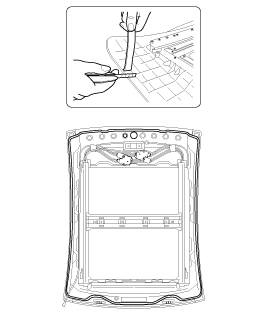
11. |
Open the space between chassis and sunroof using flathead screwdriver,
and then cut the sealant of front using a tool (09816-2P121, 09816-2P122)
(B).
|
• |
This blade has a inclination to push upward.(09816-2P121,
09816-2P122)
|
|
• |
This blade has a inclination to push downward.
(09816-2P123, 09816-2P124)
|
|
|
|
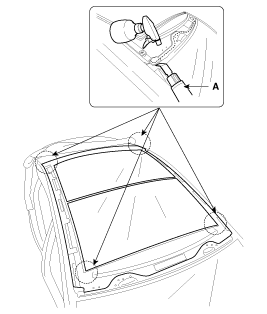
12. |
Cut off the sealant by pulling the piano wire (B) around the back
panoramaroof assembly (A).
|
|
13. |
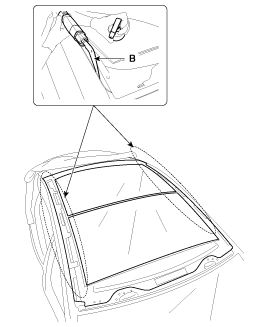
Open the space between chassis and sunroof using flathead screwdriver,
and then cut the sealant of side using a tool (09816-2P121, 09816-2P122)
(B).
|
• |
This blade has a inclination to push upward.(09816-2P121,
09816-2P122)
|
|
• |
This blade has a inclination to push downward.
(09816-2P123, 09816-2P124)
|
|
|
|
14. |
Cut off the sealant by pulling the piano wire (A) around the back
panoramaroof assembly (B).
|
|
15. |
Cut the tape between the panoramaroof and the body. Remove the
panoramaroof (A).
|
• |
When removing and installing the panoramaroof,
an assistant is necessary.
|
|
|
|
1. |
With a knife, scrape the old adhesive smooth to a thickness of
about 2mm (0.08 in.) on the bonding surface around the entire panoramaroof
opening flange:
|
• |
Do not scrape down to the painted surface of the
body; damaged paint will interfere with proper bonding.
|
|
• |
Remove the rubber dam and fasteners from the body.
|
|
• |
Mask off surrounding surfaces before painting.
|
|
|
|
2. |
Clean the body bonding surface with a sponge dampened in alcohol.
After cleaning, keep oil, grease and water from getting on the clean
surface.
|
|
3. |
With a sponge, apply a light coat of body primer to the original
adhesive remaining around the windshield opening flange. Let the body
primer dry for at least 10 minutes :
|
• |
Do not apply glass primer to the body, and be
careful not to mixup glass and body primer sponges.
|
|
• |
Never touch the primed surfaces with your hands.
|
|
• |
Mask off surrounding surfaces before painting.
|
|
|
|
4. |
Apply a light coat of glass primer to the outside of the fasteners.
|
• |
Never touch the primed surface with your hand.
If you do, the adhesive may not bond to the glass properly,
causing a leak after the windshield glass is installed.
|
|
• |
Do not apply body primer to the glass.
|
|
• |
Keep water, dust, and abrasive materials away
from the primer.
|
|

|
|
5. |
Pack adhesive into the cartridge without air pockets to ensure
continuous delivery. Put the cartridge in a caulking gun, and run a
bead of sealant (B) around the edge of the panoramaroof (A) as shown.
Apply the adhesive within 30 minutes after applying the glass primer.
Make a slightly thicker bead at each corner.
|
|
6. |
Fix the panoramaroof to center hall (A) of body, install carefully
the panoramaroof to the body frame.
|
• |
When you install the panoramaroof, work with mans
over four.
|
|
|
|
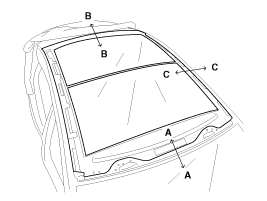
7. |
Check the Clearance and gap for each side after installing the
panoramaroof.
|
Section
|
Gap
|
Clearance
|
Front edge
|
A-A
|
2.3 -1 ~ 0mm
(0.0906 - 0.0394 ~ 0 in.)
|
7.5 ± 1mm
(0.2953 ± 0.0394 in.)
|
Rear edge
|
B-B
|
2.2 -1 ~ 0mm
(0.0866 - 0.0394 ~ 0 in.)
|
6.8 ~ 1.5mm
(0.0677 ~ 0.0591 in.)
|
Side edge
|
C-C
|
3.60 ± 5mm
( 0.1417 ± 0.0197 in.)
|
2mm
(0.0787 in.)
|
|
|
8. |
Install the nuts (A) to the panormaroof.
Tightening torque :
19.6 ~ 29.4 N.m (2.0 ~ 3.0 kgf.m, 14.5 ~ 21.7lb-ft)
|
|
|
9. |
Scrape or wipe the excess adhesive off with a putty knife or towel.
To remove adhesive from a painted surface or the windshield, wipe with
a soft shop towel dampened with alcohol.
|
|
10. |
Let the adhesive dry for at least one hour, then spray water over
the roof and check for leaks. If a leak occurs, let it dry, then seal
with sealant :
| A. |
Let the vehicle stand for at least four hours after windshield
installation. If the vehicle must be driven within 4 hours,
it must be driven slowly.
|
| A. |
Keep the windshield dry for the first hour after installation.
|
|
|
11. |
Reinstall all remaining removed parts. Install the rearview mirror
after the adhesive has dried thoroughly. Advise the customer not to
do the following things for two the three days :
| A. |
Slam the door with all the windows rolled up.
|
| A. |
Twist the body excessively (such as when going in and
out of driveways at an angle or driving over rough, uneven roads).
|
|
|
12. |
Installation the following items.
| A. |
Front seat
(Refer to the BD group - "Front Seat")
|
| A. |
Rear seat
(Refer to the BD group - "Rear Seat")
|
| A. |
Interior trim
(Refer to the BD group - "Interior Trim")
|
| A. |
Roof trim
(Refer to the BD group - "Roof Trim")
|
|
Adjustment
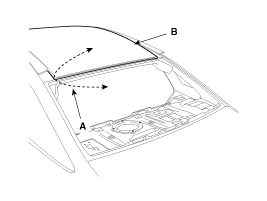
Inspect Glass Alignment
|
1. |
Check for abnormal noise or bending during operation.
|
|
2. |
With the sunroof fully closed, check for water leakage.
|
|
3. |
The roof panel (A) should be even with the glass (B) weatherstrip,
to within the standard value "E" all the way around. If not, make the
following adjustment.
Tightening torque :
Standard value "E" [mm(in.)]
(1) Front edge : 1.0 ± 1.0mm (0.0394 ± 0.0394 in.)
(2) Rear edge : 1.0 ± 1.0mm (0.0394 ± 0.0394 in.)
(3) Side edge :0 ± 1.0mm (0 ± 0.0394 in.)
|
|
|
4. |
If the position is not as specified, lightly loosen the glass
adjusting screws (A) to adjust the glass height and tighten it.
|
• |
Do not damage the screws.
|
|
|
How To Initialize Motor
Whenever the battery is disconnected, discharged or the related fuse is
replaced or reinstalled, the panoramaroof system must be reset according to
the procedure below.
|
1. |
Turn the ignition key to the ON position and then close the panoramaroof
completely.
|
|
2. |
Release the panoramaroof control lever.ing the switch
|
|
3. |
Press and hold the CLOSE button for more than 10 seconds until
the sunroof has moved slightly.
|
|
4. |
Release the panoramaroof control lever.
|
|
5. |
Press and hold the CLOSE button once again until the sunroof do
as follows.
| A. |
Tilt → Slide Open → Slide Close
Then, release the lever.
|
|
|
6. |
Reset procedure of panorama system is finished.
|
When To Initialize The Motor
|
1. |
At the time of manufacture.
|
|
2. |
If the Initial setting is erased due to loss of power.
|
|
3. |
After using the manual handle.
|
Operating The Panoramaroof Emergency Handle
|
1. |
Use the panoramaroof emergency handle to close and open the panoramaroof
manually for the following case only.
| A. |
To close the panoramaroof before driving a vehicle in
arainy day or on the highway if the panoramaroof can not be
closed due to failure of the panoramaroof motor or controller.
|
|
|
2. |
Operating method.
| A. |
Remove the overhead console
|
| B. |
Push the emergency handle up into the hexagonal drive
of the panoramaroof motor. You must push hard enough to disengage
the motor clutch; otherwise the emergency handle will slip due
to incomplete fit in the motor.
|
| C. |
Carefully turn the emergency handle clockwise to close
the panoramaroof.
|
| D. |
After closing the sunroof, wiggle the handle back and
forth as you remove the tool from the motor, to ensure the motor
clutch reengages.
|
| E. |
A 5mm hex socket may be used in place of the emergency
handle, with a” Speeder” type handle.
|
|
• |
Do not use power tools to operate the panoramaroof.
|
|
• |
Damaged to the components may occur.
|
|
|
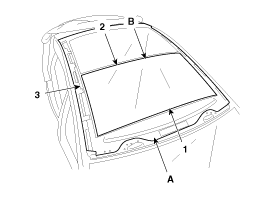
Components
1. Roof molding
2. Movable glass
3. Wind deflector
4. Front cover assembly
5. Roller blind
6. Mechanism assembly
7. Motor
8. Cover
...
Replacement
Outside Rear View Mirror Replacement
•
When prying with a flat-tip screwdriver, wra ...
See also:
Repair procedures
Operation and Leakage Check
Check all of the following items:
Component
Procedure
Brake Booster (A)
Check brake operation by applying the brakes ...
XM radio
Using XM satellite Radio
Your vehicle is equipped with a 3 month complimentary period of XM Satellite
Radio. XM provides access to over 130 channels of music, information, and entertainment
progr ...
Windows
(1) Driver’s door power window switch
(2) Front passenger’s door power window switch
(3) Rear door (left) power window switch
(4) Rear door (right) power window switch
(5) Window opening and ...
 Hyundai Sonata: Panoramaroof. Repair procedures
 Panoramaroof. Components and Components Location
 Mirror. Repair procedures