 Hyundai Sonata: Passenger Airbag (PAB) Module. Repair procedures
Removal
| 1. |
Disconnect the battery negative cable and wait for at least three
minutes before beginning work.
|
| 2. |
Remove the glove box housing. (Refer to the Body group- crash
pad).
|
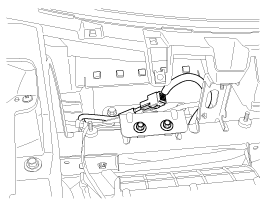
| 3. |
Disconnect the passenger airbag connector and remove the PAB mounting
bolts.
|
| 4. |
Remove the crash pad. (Refer to the Body group- crash pad).
|
| 5. |
Remove the heater duct from the crash pad.
|
| 6. |
Remove the mounting bolts from the crash pad. And then remove
the passenger airbag.
|
Installation
| 1. |
Remove the ignition key from the vehicle.
|
| 2. |
Disconnect the battery negative cable from battery and wait for
at least three minutes before beginning work.
|
| 3. |
Place the passenger airbag on the crash pad and tighten the passenger
airbag mounting bolts.
|
| 4. |
Install the heater duct to the crash pad.
|
| 5. |
Install the crash pad. (Refer to the Body group- crash pad)
|
| 6. |
Tighten the passenger airbag crash pad mounting bolts.
|
| 7. |
Connect the passenger airbag harness connector to the SRS main
harness connector.
|
| 8. |
Reinstall the glove box. (Refer to the Body group- crash pad)
|
| 9. |
Reconnect the battery negative cable.
|
| 10. |
After installing the passenger airbag (PAB), confirm proper system
operation:
|

 Side Airbag (SAB) Module. Description and Operation
Description
The Side Airbags (SAB) are installed inside the front seat and protects
the driver and passenger from danger when side crash occurs. The SRSCM determines
deployment of side airba ...
See also:
Starter. Repair procedures
Removal and Installation
1.
Remove the engine cover.
2.
Disconnect the battery negative terminal (A).
Tightening tor ...
Front Body. Body Repair
Front Body A
Front Body B
Front Body C
...
Description and Operation
Description
The Evaporative Emission Control System prevents fuel vapor stored in
fuel tank from vaporizing into the atmosphere. When the fuel evaporates in the
fuel tank, the vapor passes t ...
