
 Hyundai Sonata: Power Door Lock Relay. Repair procedures
Inspection
| 1. |
Disconnect the negative (-) battery terminal.
|
| 2. |
Remove the junction box.
|
| 3. |
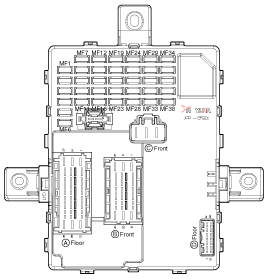
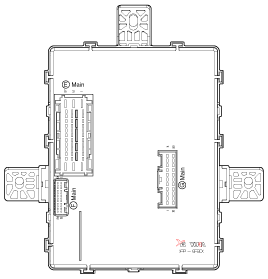
Check for continuity between the terminals.
[Front]
[Rear]
|
| 1. |
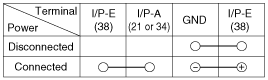
There should be continuity between the No.38 terminal in the I/P-E
and No.21(or 34) terminal in the I/P-A when power and ground are connected
to the No.38 terminal in the I/P-E and ground.
|
| 2. |
There should be no continuity between the No.38 terminal in the
I/P-E and No.21(or 34) terminal in the I/P-A when power is disconnected.
|
| 1. |
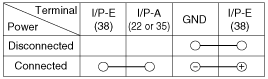
There should be continuity between the No.38 terminal in the I/P-E
and No.22(or 35) terminal in the I/P-A when power and ground are connected
to the No.38 terminal in the I/P-E and ground.
|
| 2. |
There should be no continuity between the No.38 terminal in the
I/P-E and No.22(or 35) terminal in the I/P-E when power is disconnected.
|
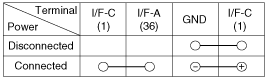
| 1. |
There should be continuity between the No.1 terminal in the I/F-C
and No.36 terminal in the I/F-A when power and ground are connected
to the No.1 terminal in the I/F-C and ground.
|
| 2. |
There should be no continuity between the No.1 terminal in the
I/F-C and No.36 terminal in the I/F-A when power is disconnected.
|
| 1. |
It will be able to diagnose defects of power door lock with GDS
quickly. GDS can operates actuator forcefully, input/output value monitoring
and self diagnosis.
|
| 2. |
Select model and "BCM".
|
| 3. |
Select the "SJB" to check.
|
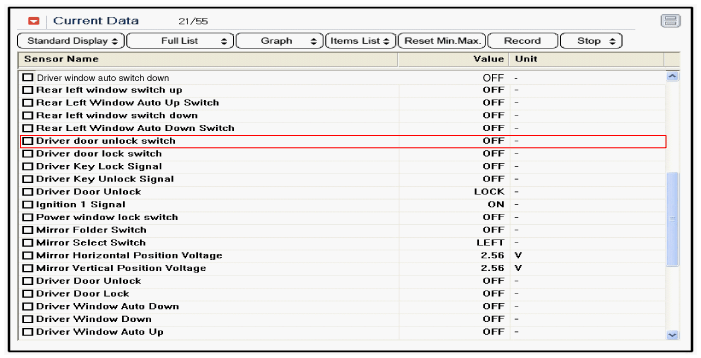
| 4. |
Select "Current data", if you will check current data of power
door lock system. It provides input/output status of SJB.
|
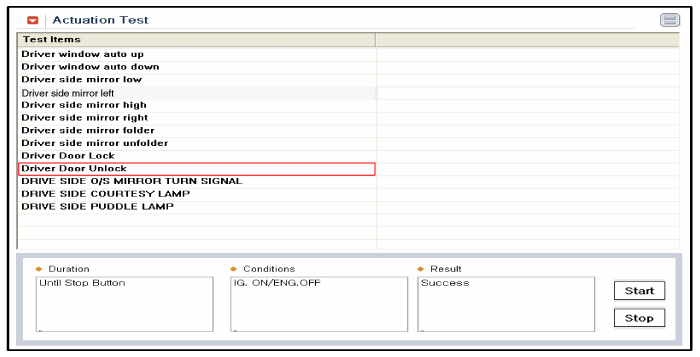
| 5. |
If you will check the power door lock operation forcefully, select
"Actuation test".
|
 Power Door Lock Actuators. Repair procedures
Inspection
Front Door Lock Actuator Inspection
1.
Remove the front door trim.
(Refer to the BD group - "Front door")
2.
R ...
 Power Door Lock Switch. Repair procedures
Inspection
Driver Door Lock Switch Inspection
1.
Disconnect the negative (-) battery terminal.
2.
Remove the front door trim panel.
...
See also:
Overhead Console Lamp. Repair procedures
Inspection
Remove the overhead console lamp assembly then check for continuity between
terminals. If the continuity is not as specified, replace the map lamp switch.
Removal
...
Aux, USB and iPod® port
If your vehicle has an aux and/or USB(universal serial bus) port or iPod port,
you can use an aux port to connect audio devices and a USB port to plug in a USB,
and an iPod port to plug in an ...
Side Impact Sensor (SIS). Description and Operation
Description
Side Impact Sensor (SIS) system consists of two P-SIS which are installed
at each center of the front door module (LH and RH) and two SIS which are installed
at each center pilla ...
