 Hyundai Sonata: Rear Lower Arm. Repair procedures
Removal
| 1. |
Remove the rear wheel & tire.
|
| 2. |
Set up the transmission jack (A) under the lower arm (B).
|
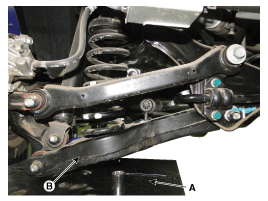
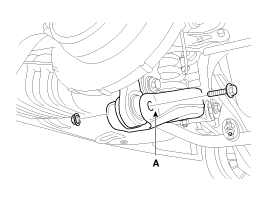
| 3. |
Loosen the nut and then remove the rear stabilizer link(B) with
the rear lower arm(A).
|
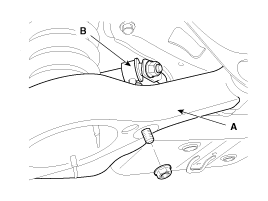
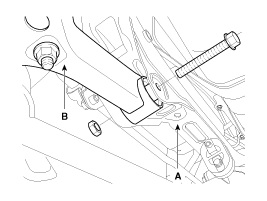
| 4. |
Loosen the bolt & nut and then remove the rear lower arm (A) with
the rear axle.
|
| 5. |
Loosen the bolt & nut and then remove the rear lower arm (A) from
the sub frame.
|
Installation
| 1. |
Installation is the reverse of removal.
|
Inspection
| 1. |
Check the bushing for wear and deterioration.
|
| 2. |
Check the rear lower arm for deformation.
|
| 3. |
Check for all bolts and nut.
|
| 4. |
Check the cracks or the cutting of the lower arm.
|
 Rear Upper Arm. Repair procedures
Removal
1.
Remove the rear wheel & tire.
Tightening torque:
88.3 ~ 107.9 N.m (9.0 ~ 11.0 kgf.m, 65.1 ~ 79.6 lb-ft)
...
 Rear Stabilizer Bar. Repair procedures
Replacement
1.
Remove the rear wheel & tire.
Tightening torque:
88.3 ~ 107.9 N.m (9.0 ~ 11.0 kgf.m, 65.1 ~ 79.6 lb-ft)
...
See also:
Clothes hanger
To use the hanger, pull down the upper portion of hanger.
CAUTION
Do not hang heavy clothes, because it may damage the hook. ...
Certification label
The certification label is located on the driver's door sill at the center pillar.
This label shows the maximum allowable weight of the fully loaded vehicle. This
is called the GVWR (Gross ...
General Information
General Troubleshooting Information
Before Troubleshooting
1.
Check applicable fuses in the appropriate fuse/relay box.
2.
Check the batter ...
