 Hyundai Sonata: Repair procedures
Inspection
[System Inspection]
| 1. |
Disconnect the vapor hose from the throttle body and connect a
vacuum pump to the nipple on the throttle body.
|
| 2. |
Check the following points with applied vacuum using a vacuum
pump.
· At Cold Engine [Engine Coolant Temperature < 60°C(140°F)]
· At Warmed Engine [Engine Coolant Temperature. 80°C(176°F)]
|
[PCSV Inspection]
| 1. |
Turn ignition switch OFF and disconnect the negative (-) battery
cable.
|
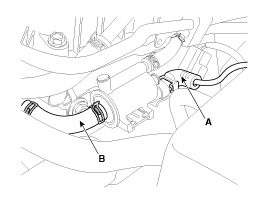
| 2. |
Disconnect the PCSV connector (A).
|
| 3. |
Disconnect the vapor hose (B) which is connected to the intake
manifold from the PCSV.
|
| 4. |
After connecting a vacuum pump to the nipple, apply vacuum.
|
| 5. |
With the PCSV control line grounded, check the valve operation
with battery voltage applied to the PCSV(Open) and removed(Closed).
|
| 6. |
Measure the coil resistance of the PCSV.
|
[EVAP. Leakage Test]
| 1. |
Select "Evap. Leakage Test".
|
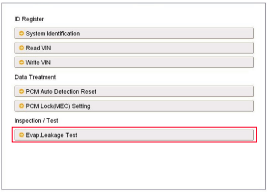
| 2. |
Proceed with the test according to the screen introductions.
|

 Schematic Diagrams
Schematic Diagram
Canister
The Canister is filled with charcoal and absorbs evaporated fuel vapor
from the fuel tank. The gathered fuel vapor in canister is drawn into the intake
man ...
 Canister. Repair procedures
Removal
1.
Disconnect the canister close valve connector (A).
2.
Disconnect the ventilation tube quick-connector (B) and the vapor
tube qu ...
See also:
Purge Control Solenoid Valve (PCSV). Schematic Diagrams
Circuit Diagram
...
Fuel Tank. Repair procedures
Removal
1.
Release the residual pressure in fuel line (Refer to “Release
Residual Pressure in Fuel Line” in this group).
2.
Remove the ...
Hands Free Mic. Repair procedures
Inspection
1.
Disconnect the negative(-) battery terminal.
2.
Remove the roof trim.
(Refer to the BD group - "Roof trim")
...
