 Hyundai Sonata: Seat Belt Pretensioner (BPT). Repair procedures
Removal
| 1. |
Disconnect the battery negative cable, and wait for at least three
minutes before beginning work.
|
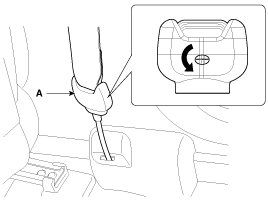
| 2. |
Using a flat-tip screwdriver, remove the seat belt anchor pretensioner
(A).
|
| 3. |
Remove the door scuff trim. (Refer to the Body group- Interior
trim)
|
| 4. |
Remove the center pillar trim. (Refer to the Body group- Interior
trim)
|
| 5. |
Remove the upper anchor bolt.
|
| 6. |
Disconnect the seat belt pretensioner connector (A).
|

| 7. |
Loosen the seat belt pretensioner mounting bolts (B, C) and remove
the seat belt pretensioner.
|
Installation
| 1. |
Remove the ignition key from the vehicle.
|
| 2. |
Disconnect the battery negative cable and wait for at least three
minutes.
|
| 3. |
Install the seat belt pretensioner with bolts (B, C).
|

| 4. |
Connect the seat belt pretensioner connector (A).
|
| 5. |
Install the upper anchor bolt.
|
| 6. |
Install the center pillar trim. (Refer to the Body group- Interior
trim)
|
| 7. |
Install the door scuff trim. (Refer to the Body group- Interior
trim)
|
| 8. |
Insert the seat belt to the anchor pretensioner.
|
| 9. |
Reconnect the battery negative cable.
|
| 10. |
After installing the seat belt pretensioner, confirm proper system
operation:
|

 Anchor Pretensioner (APT). Description and Operation
Description
Front seat belt anchor pretensioner operates as well as belt pretensioner
at the same time If it gets into its deploy condition after a collision. It
is located at near anchor on ...
See also:
SRS components and functions
The SRS consists of the following components:
1. Driver's front air bag module
2. Passenger's front air bag module
3. Side impact air bag modules
4. Curtain air bag modules
5. Retractor ...
Lift And Support Points
When heavy rear components such as suspension, fuel
tank, spare tire, tailgate and trunk lid are to be removed, place additio ...
Start/Stop Button. Components and Components Location
Component
...
