
 Hyundai Sonata: Sunroof Motor. Repair procedures
Inspection
| 1. |
Disconnect the negative (-) battery terminal.
|
| 2. |
Remove the overhead console and roof trim.
(Refer to the BD group - "Roof trim")
|
| 3. |
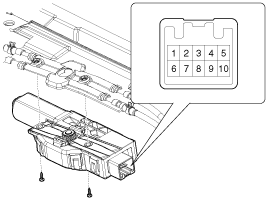
Remove the sunroof motor after removing the screws and connector
(10P).
|
| 4. |
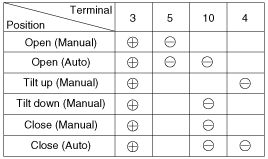
Ground the terminals as below table, and check that the sunroof
unit operates as below table.
|
| 5. |
Make these input tests at the connector
If any test indicates a problem, find and correct the cause, then
recheck the system.
If all the input tests prove OK, the sunroof motor must be faulty;
replace it.
|
Resetting The Sunroof
Whenever the vehicle battery is disconnected or discharged, or you use
the emergency handle to operate the sunroof, you have to reset your sunroof
system as follows :
| 1. |
Turn the ignition key to the ON position.
|
| 2. |
According to the position of the sunroof, do as follows.
|
| 3. |
Release the TILT button.
|
| 4. |
Press and hold the TILT button once again until the sunroof has
returned to the original position of TILT after it is raised a little
higher than the maximum TILT position.
When this is complete, the sunroof system is reset.
|
Protecting Motor From Overheating
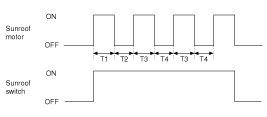
In order to protect the sunroof motor from overheating from continuous
motor operation, the sunroof ECU controls the Run-time and Cool-time of the
motor as follows:
| 1. |
The Sunroof ECU detects the Run- time of motor
|
| 2. |
Motor can be operated continuously for the 1st run-time(120 ±
10sec.).
|
| 3. |
The continuous operation of motor stops after the 1st Run-time(120
± 10sec.).
|
| 4. |
Then Motor is not operated for the 1st Cool-time(18 ± 2sec.).
|
| 5. |
Motor is operated for the 2nd Run-time(10 ± 2sec.) at the continued
motor operation after 1st Cool-time(18 ± 2sec.)
|
| 6. |
The continuous operation of motor stops operating after the 2nd
Run-time(10 ± 2sec.)
|
| 7. |
Motor is not operated for the 2nd Cool-time(18 ± 2sec.).
|
| 8. |
Motor repeats the 2nd run-time and 2nd cool-time at the continued
motor operation.
T1 : 120 ± 10 sec., T2 : 18 ± 2 sec.,
T3 : 10 ± 2 sec., T4 : 18 ± 2 sec.
|
 Sunroof Switch. Repair procedures
Inspection
1.
Disconnect the negative (-) battery terminal.
2.
Open the sunglass case cover from the overhead console then remove
the 2 sc ...
 Lighting System
...
See also:
Hands Free Switch. Schematic Diagrams
Circuit Diagram
...
Horn
To sound the horn, press the horn symbol on your steering wheel.
Check the horn regularly to be sure it operates properly.
✽ NOTICE
To sound the horn, press the area indicated by the hor ...
Fuel Tank Pressure Sensor (FTPS). Specifications
Specification
Pressure
[kPa (kgf/cm², in H2O)
Output Voltage (V)
-6.67 (-0.068, -26.8)
0.5
0
2.5
...
