 Hyundai Sonata: Description and Operation
Warning Lamp Activation
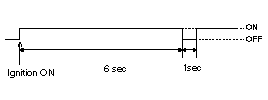
| Warning Lamp Behavior after Ignition On |
As soon as the operating voltage is applied to the SRSCM ignition input,
the SRSCM activates the warning lamp for a LED lamp check.
The lamp shall turn on for 6 seconds during the initialization phase and
be turned off afterward.
To alert the driver, the warning lamp shall turn on for 6 seconds and
off for one second then on continuously after the operating voltage is applied
if any active fault exists.
| 1. |
Active fault or historical fault counter is greater or equal to
10.
|
| 2. |
Normal or historical fault counter is less than 10.
|
| 3. |
When turning the ignition switch ON during variant coding (EOL)
mode, the airbag warning lamp is turned on and blinks at intervals of
1 second till the coding is completed.
If the variant coding is completed normally, the airbag warning
lamp will turn on for 6 seconds, and then turned off. Otherwise the
airbag warning lamp continuously blinks at intervals of 1 second.
When there is active fault in airbag system or SRSCM internal
fault, the variant coding (EOL) cannot be completed. In this case, perform
the variant coding (EOL) procedure again after troubleshooting with
the GDS.
|
SRSCM Independent Warning Lamp Activation
There are certain fault conditions in which the SRSCM cannot function
and thus cannot control the operation of the standard warning lamp. In these
cases, the standard warning lamp is directly activated by appropriate circuitry
that operates independently of the These cases are:
| 1. |
Loss of battery supply to the SRSCM : warning lamp turned on continuously.
|
| 2. |
Loss of internal operating voltage : warning lamp turned on continuously.
|
| 3. |
Loss of Microprocessor operation : warning lamp turned on continuously.
|
| 4. |
SRSCM not connected : warning lamp turned on continuously.
|
Telltale Lamp Activation
The Telltale Lamp indicates the Passenger Airbag(PAB) enabled and disabled
status based on occupant status of passenger seat. If the passenger seat is
empty or occupied with child (or child seat), the Passenger Airbag is disabled
and the Telltale Lamp is turned ON to inform the driver that the PAB is disabled.
As soon as operating voltage is applied to the SRSCM ignition input, the SRSCM
activates telltale lamp prove out. ODS (Occupant Detection System) will send
an indeterminate status to the SRSCM as a default setting for passenger airbag
deployment during the prove out period.
After ignition on, telltale lamp will turn on for 4 seconds and turn off
for 3 seconds during the initialization phase and be turned NO afterward until
receipt of valid enabled message from ODS system.

 General Safety Information and Caution
Precautions
General Precautions
Please read the following precautions carefully before performing the
airbag system service.
Observe the instructions described in this manual, ...
 Repair procedures
Component Replacement After Deployment
Before doing any SRS repairs, use the GDS Pro to check for DTCs.
Refer to the Diagnosti ...
See also:
Variable Intake Solenoid (VIS) Valve. Repair procedures
Inspection
1.
Turn the ignition switch OFF.
2.
Disconnect the VIS valve connector.
3.
Measure resistance betwe ...
Schematic Diagrams
System Block Diagram
Component Parts And Function Outline
Component part
Function
Vehicle speed sensor
Converts vehicle speed to pulse.
...
Relay Box (Engine Compartment). Description and Operation
Description
Network Configuration
The Network of the SJB(Smart Junction Box) consists of Low speed CAN as
shown in the following figure.
Termination Resistor
The SJB has CAN ter ...


