Inspection
|
1. |
Turn the ignition switch OFF.
|
|
2. |
Disconnect the PCSV connector.
|
|
3. |
Measure resistance between the PCSV terminals 1 and 2.
|
|
4. |
Check that the resistance is within the specification.
Specification:
Refer to “Specification”
|
|
Removal
|
1. |
Turn the ignition switch OFF and disconnect the battery negative
(-) cable.
|
|
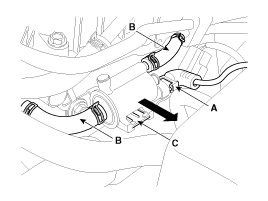
2. |
Disconnect the purge control solenoid valve connector (A).
|
|
3. |
Disconnect the vapor hoses (B) from the purge control solenoid
valve.
|
|
4. |
Remove the valve from the bracket (C) in the direction of the
arrow.
|
Installation
| •
|
Install the component with the specified torques.
|
| •
|
Note that internal damage may occur when the component
is dropped. If the component has been dropped, inspect before
installing.
|
|
| •
|
Use care to keep foreign material out of the valve.
|
|
|
1. |
Installation is reverse of removal.
Purge control solenoid valve
bracket installation bolt: 9.8 ~ 11.8 N.m (1.0
~ 1.2 kgf.m, 7.2 ~ 8.7 lb-ft)
|
|
Description
Continuous Variable Valve Timing (CVVT) system advances or retards the
valve timing of the intake and exhaust valve in accordance with the ECM control
signal which is calculated ...
See also:
Adding equipment to or modifying your air bag-equipped vehicle
If you modify your vehicle by changing your vehicle's frame, bumper system, front
end or side sheet metal or ride height, this may affect the operation of your vehicle's
air bag system. ...
Armed stage
Using the smart key
Park the vehicle and stop the engine. Arm the system as described below.
1.Turn off the engine.
2.Make sure that all doors, the engine hood and trunk lid are closed and latched. ...
Repair procedures
Compression Pressure Inspection
If the there is lack of power, excessive oil consumption
or poor fuel economy, measure the com ...
 Hyundai Sonata: Purge Control Solenoid Valve (PCSV). Repair procedures
 Purge Control Solenoid Valve (PCSV). Schematic Diagrams
 CVVT Oil Control Valve (OCV). Description and Operation