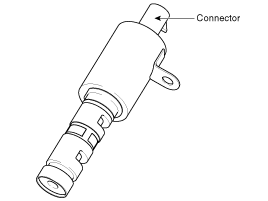
 Hyundai Sonata: CVVT Oil Control Valve (OCV). Description and Operation
Description
Continuous Variable Valve Timing (CVVT) system advances or retards the
valve timing of the intake and exhaust valve in accordance with the ECM control
signal which is calculated by the engine speed and load.
By controlling CVVT, the valve over-lap or under-lap occurs, which makes
better fuel economy and reduces exhaust gases (NOx, HC) and improves engine
performance through reduction of pumping loss, internal EGR effect, improvement
of combustion stability, improvement of volumetric efficiency, and increase
of expansion work.
This system consist of
-the CVVT Oil Control Valve (OCV) which supplies the engine oil to the
cam phaser or cuts the engine oil from the cam phaser in accordance with the
ECM PWM (Pulse With Modulation) control signal,
- the CVVT Oil Temperature Sensor (OTS) which measures the engine oil
temperature,
-and the Cam Phaser which varies the cam phase by using the hydraulic
force of the engine oil.
The engine oil getting out of the CVVT oil control valve varies the cam
phase in the direction (Intake Advance/Exhaust Retard) or opposite direction
(Intake Retard/Exhaust Advance) of the engine rotation by rotating the rotor
connected with the camshaft inside the cam phaser.

 Purge Control Solenoid Valve (PCSV). Repair procedures
Inspection
1.
Turn the ignition switch OFF.
2.
Disconnect the PCSV connector.
3.
Measure resistance between th ...
 CVVT Oil Control Valve (OCV). Specifications
Specification
Item
Specification
Coil Resistance (Ω)
6.9 ~ 7.9 [20°C(68°F)]
...
See also:
Floor mat anchor(s)
When using a floor mat on the front floor carpet, make sure it attaches to the
floor mat anchor(s) in your vehicle. This keeps the floor mat from sliding forward.
WARNING
The following must be ...
Rear seat
Headrest
The rear seat(s) is equipped with headrests in all the seating positions for
the occupant's safety and comfort. The headrest not only provides comfort for passengers,
but also he ...
Rheostat. Repair procedures
Inspection
1.
Disconnect the negative (-) battery terminal.
2.
Remove the lower crash pad switch (A) from the side crash pad
cover by usin ...
