 Hyundai Sonata: Relay Box (Passenger Compartment). Repair procedures
Fuse Inspection
| 1. |
Be sure there is no play in the fuse holders, and that the fuses
are held securely.
|
| 2. |
Are the fuse capacities for each circuit correct?
|
| 3. |
Are there any blown fuses?
If a fuse is to be replaced, be sure to use a new fuse of the
same capacity. Always determine why the fuse blew first and completely
eliminate the problem before installing a new fuse.
|
Relay Inspection
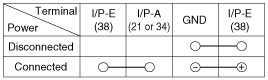
| 1. |
There should be continuity between the No.38 terminal in the I/P-E
and No.21(or 34) terminal in the I/P-A when power and ground are connected
to the No.38 terminal in the I/P-E and ground.
|
| 2. |
There should be no continuity between the No.38 terminal in the
I/P-E and No.21(or 34) terminal in the I/P-A when power is disconnected.
|
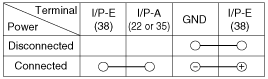
| 1. |
There should be continuity between the No.38 terminal in the I/P-E
and No.22(or 35) terminal in the I/P-A when power and ground are connected
to the No.38 terminal in the I/P-E and ground.
|
| 2. |
There should be no continuity between the No.38 terminal in the
I/P-E and No.22(or 35) terminal in the I/P-E when power is disconnected.
|
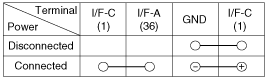
| 1. |
There should be continuity between the No.1 terminal in the I/F-C
and No.36 terminal in the I/F-A when power and ground are connected
to the No.1 terminal in the I/F-C and ground.
|
| 2. |
There should be no continuity between the No.1 terminal in the
I/F-C and No.36 terminal in the I/F-A when power is disconnected.
|
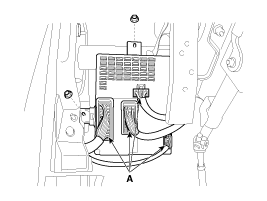
Removal
| 1. |
Disconnect the negative(-) battery terminal.
|
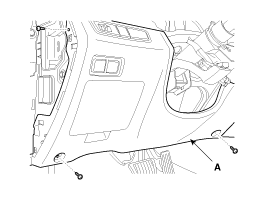
| 2. |
Remove the crash pad lower panel (A).
(Refer to the BD group - "Crash pad")
|
| 3. |
Disconnect the connectors (A) from the fuse side of the smart
junction box.
|
| 4. |
Remove the smart junction box after loosening the mounting nuts
(2EA).
|
| 5. |
Disconnect the connectors from the back side of the smart junction
box.
|
Installation
| 1. |
Install the smart junction box.
|
| 2. |
Install the crash pad lower panel.
|
| 3. |
Check that all system operates normally.
|

 The Other Fuses And Relays Component. Repair procedures
Inspection
Power Relay Test (Type B)
Check for continuity between the terminals.
A : Two turn unlock relay
1.
There should be continuity between the No.30 and No.87 ...
See also:
Schematic Diagrams
Schematic Diagram
Canister
The Canister is filled with charcoal and absorbs evaporated fuel vapor
from the fuel tank. The gathered fuel vapor in canister is drawn into the intake
man ...
Components and Components Location
Component Location
1. Audio unit
2. Midrange speaker
3. External amplifier
4. Glass antenna (AM/FM)
5. Front door speaker
6. Rear door speaker
7. Woofer s ...
Normal maintenance schedule
The following maintenance services must be performed to ensure good emission
control and performance. Keep receipts for all vehicle emission services to protect
your warranty. Where both mileage a ...
