 Hyundai Sonata: Repair procedures
Inspection
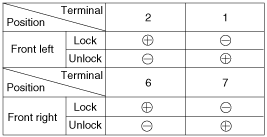
Front Door Lock Actuator Inspection
| 1. |
Remove the front door trim.
(Refer to the BD group - "Front door")
|
| 2. |
Remove the front door module.
|
| 3. |
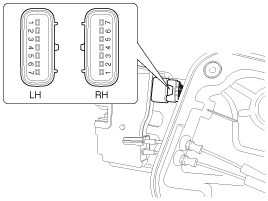
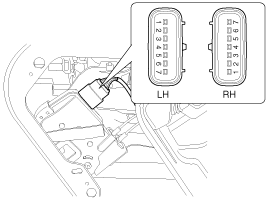
Disconnect the 7P connector from the actuator.
|

| 4. |
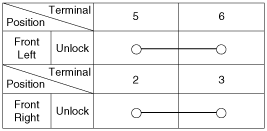
Check actuator operation by connecting power and ground according
to the table. To prevent damage to the actuator, apply battery voltage
only momentarily.
|
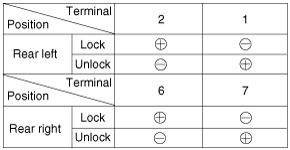
Rear Door Lock Actuator Inspection
| 1. |
Remove the rear door trim.
(Refer to the BD group - "Rear door")
|
| 2. |
Remove the rear door module.
|
| 3. |
Disconnect the 7P connector from the actuator.
|
| 4. |
Check actuator operation by connecting power and ground according
to the table. To prevent damage to the actuator, apply battery voltage
only momentarily.
|
Trunk Lid Release Actuator Inspection
| 1. |
Remove the trunk lid trim panel.
(Refer to the BD group - "Trunk lid")
|
| 2. |
Disconnect the 3P connector from the actuator.
|
| 3. |
Check actuator operation by connecting power and ground according
to the table. To prevent damage to the actuator, apply battery voltage
only momentarily.
|

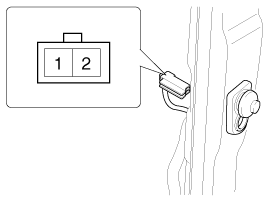
Front Door Lock Switch Inspection
| 1. |
Remove the front door trim panel.
(Refer to the BD group - "Front door")
|
| 2. |
Remove the front door module.
|
| 3. |
Disconnect the 7P connector from the actuator.
|
| 4. |
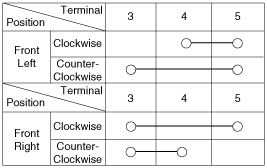
Check for continuity between the terminals in each switch position
when inserting the key into the door according to the table.
|
Rear Door Lock Switch Inspection
| 1. |
Remove the rear door trim panel.
(Refer to the BD group - "Rear door")
|
| 2. |
Remove the rear door module.
|
| 3. |
Disconnect the 7P connector from the actuator.
|
| 4. |
Check for continuity between the terminals in each switch position
according to the table.
|

Trunk Lid Open Switch Inspection
| 1. |
Remove the trunk lid trim.
(Refer to the BD group - "Trunk lid")
|
| 2. |
Disconnect the 3P connector from the actuator.
|
| 3. |
Check for continuity between the terminals in each switch position
according to the table.
|

Door Switch Inspection
Remove the door switch and check for continuity between the terminals.

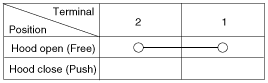
Hood Switch Inspection
| 1. |
Disconnect the connector from the hood switch (A).
|
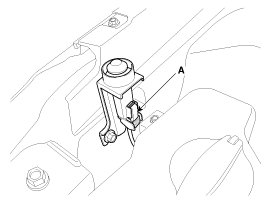
| 2. |
Check for continuity between the terminals and ground according
to the table.
|
Burglar Horn Inspection
| 1. |
Remove the burglar horn (A) after removing 1 bolt and disconnect
the 2P connector from the burglar horn.
|
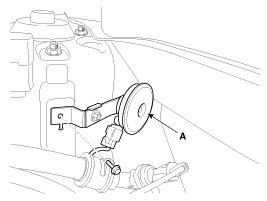
| 2. |
Test the burglar horn by connecting battery power to the terminal
1 and ground the terminal 2.
|
| 3. |
The burglar horn should make a sound. If the burglar horn fails
to make a sound replace it.
|
 Description and Operation
Description
Burglar Alarm System
The burglar alarm system is armed automatically after the doors, hood,
and trunk lid are closed and locked.
The system is set off when any of these ...
 Transmitter. Repair procedures
Inspection
1.
Check that the red light flickers when the door lock or unlock
button is pressed on the transmitter.
2.
Remove the battery ( ...
See also:
Radiator. Components and Components Location
Components
1. Cooling fan assembly
2. Radiator
3. Mounting insulator
4. Radiator mounting bracket
5. Radiator upper hose
6. Radiator lower hose
7. Reservo ...
Closing the trunk
To close the trunk, lower the trunk lid, then press down on it until it locks.
To be sure the trunk lid is securely fastened, always check by trying to pull it
up again.
WARNING
The trunk lid sh ...
ESC Control Module. Repair procedures
Removal
1.
Turn the ignition switch OFF.
2.
Remove the air cleaner assembly (A).
3.
Pull up the lock o ...
