 Hyundai Sonata: Seat Heater. Repair procedures
Inspection
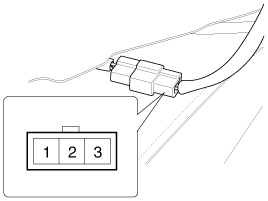
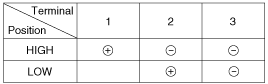
First Seat Heater
| 1. |
Check for continuity and measure the resistance between terminals.
[Cushion]
[Back]
|

| 2. |
Operate the seat heater after connecting the connector, and then
check the thermostat by measuring the temperature of seat surface.
|
| 3. |
Check for continuity between the terminals after disconnecting
the connector.
|
2nd Seat Heater
| 1. |
Check for continuity and measure the resistance between No.1 and
NO.3 terminals.
|
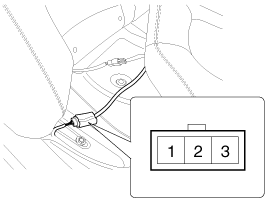
| 2. |
Operate the seat warmer after connecting the 3P connector, and
then check the thermostat by measuring the temperature of seat surface.
|
 Seat Heater. Schematic Diagrams
Circuit Diagram
...
 Fuel Filler Door
...
See also:
Troubleshooting
Troubleshooting
Symptom
Suspected area
Repairment
Pressing power switch does not turn on system
Radio receiver power source circuit
...
Removing and storing the spare tire
Turn the tire hold-down wing bolt counterclockwise.
Store the tire in the reverse order of removal.
To prevent the spare tire and tools from “rattling” while the vehicle is in motion,
stor ...
Positive Crankcase Ventilation (PCV) Valve. Repair procedures
Removal
1.
Disconnect the vapor hose (A).
2.
Remove the PCV valve (B).
Inspection
1.
Insert a thin ...
