 Hyundai Sonata: Shift Lever. Repair procedures
Removal
| 1. |
Remove the center console assembly. (Refer to "Interior"
in BD group.)
|
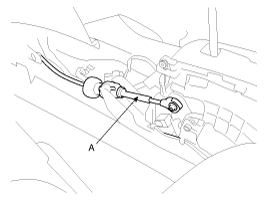
| 2. |
Remove the control cable (A).
|
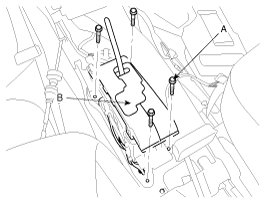
| 3. |
Remove the shift lever assembly (B) by removing the
bolts (A-4ea).
|
| 4. |
Remove the shift cable assembly in the vehicle after
removing the nuts (B) and the retainer (A).
|

| 5. |
Remove the cable from the bracket at transaxle assembly
side (Refer to "Automatic Transaxle" in this group).
|
| 6. |
Remove the shift cable at cabin room.
|
Inspection
| 1. |
Check the damage and operation of the control cable.
|
| 2. |
Check the damage of the boot.
|
| 3. |
Check the damage and corrosion of the bushing.
|
| 4. |
Check the damage or weakening of the spring.
|
Adjustment
| Adjusting method for T/M control cable |
| 1. |
Set room side lever and T/M side lever to "N" position.
|
| 2. |
Connect room side lever and shift cable.
|
| 3. |
Push cable to "F" direction shown to eliminate FREE
PLAY.
|
| 4. |
Tighten adjusting nut (A).
|

| 5. |
After adjusting according Check to be sure that this
part operates surely at each range of T/M side corresponding to each
position of room lever.
|
Installation
| 1. |
Installation is the reverse of removal.
|
 Shift Lever. Components and Components Location
Components
1. Shift lever knob
2. Shift lever assembly
3. Sport mode connector
4. Control cable assembly
5. Retainer
6. Automatic transaxle assembly
...
 Transaxle Control Module (TCM). Schematic Diagrams
1. TCM Connector and Terminal Function
2. TCM Terminal Function
Connector [CHG-AG]
Pin
Description
Pin
Description
1
& ...
See also:
HD radio
Listening to HD Radio Stations
HD Radio Technology is a digital radio technology used by AM and FM radio station
to transmit audio and data via a digital signal in conjunction with their analog
...
Curtain Airbag (CAB) Module. Repair procedures
Removal
1.
Disconnect the battery negative cable and wait for at least 3
minutes before beginning work.
2.
Remove the roof trim. (Refer to ...
Eco Coach
• What is Eco Coach?
Every 2.5 minutes, Eco Coach compares your fuel economy against the government
tested average (EPA) or other similar Hyundai models (community), based on your
preference. ...
