Replacement
Front Pillar Trim Replacement
| •
|
Put on gloves to protect your hands.
|
| •
|
When prying with a flat-tip screwdriver, wrap it with
protective tape to prevent damage.
|
| •
|
Take care not to bend or scratch the trim and panels.
|
|
|
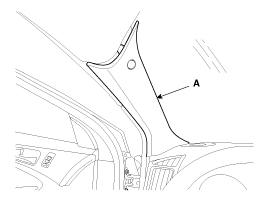
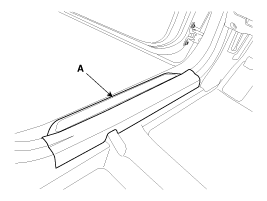
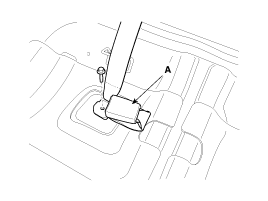
1. |
Remove the front pillar trim (A).
|
|
2. |
Installation is the reverse of removal.
|
• |
Replace any damage clips.
|
|
|
Center Pillar Trim Replacement
| •
|
Put on gloves to protect your hands.
|
| •
|
When prying with a flat-tip screwdriver, wrap it with
protective tape to prevent damage.
|
| •
|
Take care not to bend or scratch the trim and panels.
|
|
|
1. |
Remove the front door scuff trim and rear door scuff trim.
|
|
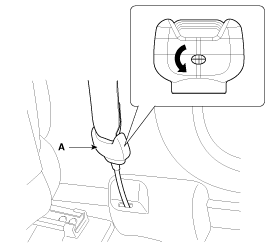
2. |
Using a screwdriver or remover, remove the seat belt lower anchor
(A).
|
|
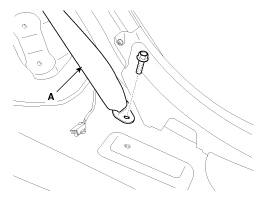
3. |
Remove the center pillar lower trim (A).

|
|
4. |
After loosening the mounting screws, then remove the center pillar
upper trim (A).
|
|
5. |
Installation is the reverse of removal.
|
• |
Replace any damaged clips.
|
|
|
Rear Pillar Trim Replacement
| •
|
Put on gloves to protect your hands.
|
| •
|
When prying with a flat-tip screwdriver, wrap it with
protective tape to prevent damage.
|
| •
|
Take care not to bend or scratch the trim and panels.
|
|
|
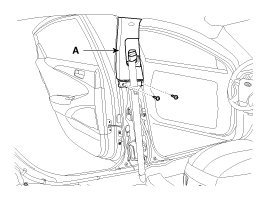
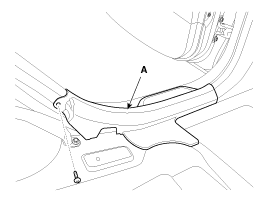
1. |
Remove the rear pillar trim (A).
|
|
2. |
Installation is the reverse of removal.
|
• |
Replace any damaged clips.
|
|
|
Door Scuff Trim Replacement
| •
|
Put on gloves to protect your hands.
|
| •
|
When prying with a flat-tip screwdriver, wrap it with
protective tape to prevent damage.
|
| •
|
Take care not to bend or scratch the trim and panels.
|
|
|
1. |
Remove the door scuff trim (A).
[Front]
[Rear]
|
|
2. |
Installation is the reverse of removal.
|
• |
Replace any damaged clips.
|
|
|
Cowl Side Trim Replacement
| •
|
Put on gloves to protect your hands.
|
| •
|
When prying with a flat-tip screwdriver, wrap it with
protective tape to prevent damage.
|
| •
|
Take care not to bend or scratch the trim and panels.
|
|
|
1. |
Remove the front door scuff trim.
|
|
2. |
Remove the hood latch release handle.
(Refer to the BD group - "Hood")
|
|
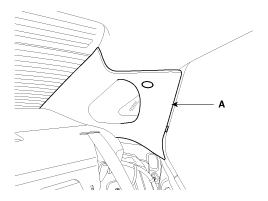
3. |
Detach the clip, then remove the cowl side trim (A).
|
|
4. |
Installation is the reverse of removal.
|
• |
Replace any damaged clips.
|
|
|
Package Tray Trim Replacement
|
1. |
Remove the rear seat assembly.
(Refer to the BD group - "Rear Seat")
|
|
2. |
After loosening the mounting bolt, then remove the rear seat belt
lower anchor (A).
[LH,RH]
Tightening torque :
39.2 ~ 53.9 N.m (4.0 ~ 5.5 kgf.m, 28.8 ~ 39.8 lb-ft)
|
[Center]
Tightening torque :
39.2 ~ 53.9 N.m (4.0 ~ 5.5 kgf.m, 28.8 ~ 39.8 lb-ft)
|
|
|
3. |
Remove the rear pillar trim (A).
|
|
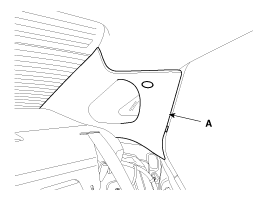
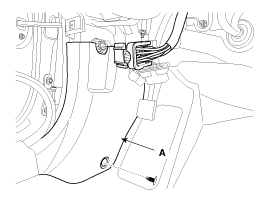
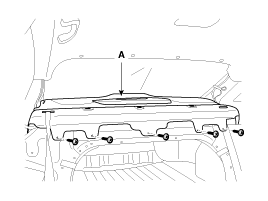
4. |
After loosening the mounting screws, then remove the package tray
trim (A).
|
|
5. |
Installation is the reverse of removal.
|
Components
1. Front pillar trim
2. Center pillar upper trim
3. Center pillar lower trim
4. Rear pillar trim
5. Cowl side trim
6. Front door scuff trim
7. ...
Replacement
•
Put on gloves to protect your hands.
•
...
See also:
Ignition switch position
LOCK
Without the immobilizer
The steering wheel locks to protect against theft. The ignition key can be removed
only in the LOCK position. When turning the ignition switch to the LOCK position ...
Clutch Pedal. Components and Components Location
Components
1. Flexibie hose
2. Flexibie
3. Turn over spring
4. Cowl bracket
5. Ignition lock switch
6. Clutch member assembly
7. Clutch arm
8. Pedal pa ...
Input Speed Sensor. Description and Operation
Description
- Integrated one unit for input & output speed sensor
- Differential current type (low: 7mA, high: 14mA)
- Failsafe: 4th gear hold (D), 2nd ~ 4th manual shift (S)
...
 Hyundai Sonata: Interior Trim. Repair procedures
 Interior Trim. Components and Components Location
 Trunk Trim. Repair procedures