 Hyundai Sonata: Relay Box (Passenger Compartment). Repair procedures
Fuse Inspection
| 1. |
Be sure there is no play in the fuse holders, and that the fuses
are held securely.
|
| 2. |
Are the fuse capacities for each circuit correct?
|
| 3. |
Are there any blown fuses?
If a fuse is to be replaced, be sure to use a new fuse of the
same capacity. Always determine why the fuse blew first and completely
eliminate the problem before installing a new fuse.
|
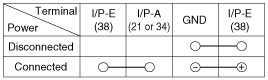
Relay Inspection
| 1. |
There should be continuity between the No.38 terminal in the I/P-E
and No.21(or 34) terminal in the I/P-A when power and ground are connected
to the No.38 terminal in the I/P-E and ground.
|
| 2. |
There should be no continuity between the No.38 terminal in the
I/P-E and No.21(or 34) terminal in the I/P-A when power is disconnected.
|
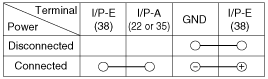
| 1. |
There should be continuity between the No.38 terminal in the I/P-E
and No.22(or 35) terminal in the I/P-A when power and ground are connected
to the No.38 terminal in the I/P-E and ground.
|
| 2. |
There should be no continuity between the No.38 terminal in the
I/P-E and No.22(or 35) terminal in the I/P-E when power is disconnected.
|
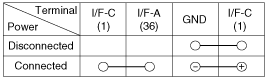
| 1. |
There should be continuity between the No.1 terminal in the I/F-C
and No.36 terminal in the I/F-A when power and ground are connected
to the No.1 terminal in the I/F-C and ground.
|
| 2. |
There should be no continuity between the No.1 terminal in the
I/F-C and No.36 terminal in the I/F-A when power is disconnected.
|
Removal
| 1. |
Disconnect the negative(-) battery terminal.
|
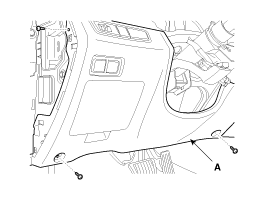
| 2. |
Remove the crash pad lower panel (A).
(Refer to the BD group - "Crash pad")
|
| 3. |
Disconnect the connectors (A) from the fuse side of the smart
junction box.
|
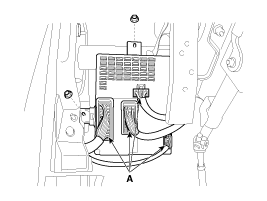
| 4. |
Remove the smart junction box after loosening the mounting nuts
(2EA).
|
| 5. |
Disconnect the connectors from the back side of the smart junction
box.
|
Installation
| 1. |
Install the smart junction box.
|
| 2. |
Install the crash pad lower panel.
|
| 3. |
Check that all system operates normally.
|

 The Other Fuses And Relays Component. Repair procedures
Inspection
Power Relay Test (Type B)
Check for continuity between the terminals.
A : Two turn unlock relay
1.
There should be continuity between the No.30 and No.87 ...
See also:
Steering Angle Sensor. Description and Operation
Description
The Steering Angle Sensor (SAS) is installed in EPS (Electric Power Steering)
and it sends messages to HECU through CAN communication line.
The SAS is used to determine turning ...
Repair procedures
On-vehicle Inspection
•
Check that the battery cables are connected to the correct
terminals ...
Child restraint system
Children riding in the car should sit in the rear seat and must always be properly
restrained to minimize the risk of injury in an accident, sudden stop or sudden
maneuver. According to accident s ...
