Replacement
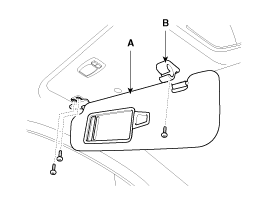
Sunvisor Replacement
| •
|
When prying with a flat-tip screwdriver, wrap it with
protective tape to prevent damage.
|
| •
|
Put on gloves to protect your hands.
|
|
|
1. |
Loosen the mounting screws, then remove the sunvisor (A) and retainer
(B).
|
|
2. |
Installation is the reverse of removal.
|
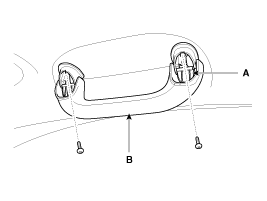
Assist Handle Replacement
| •
|
When prying with a flat-tip screwdriver, wrap it with
protective tape to prevent damage.
|
| •
|
Put on gloves to protect your hands.
|
|
|
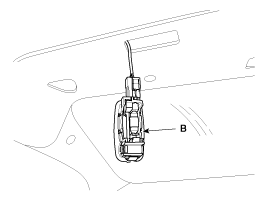
1. |
Remove the covers (A) and screws, then remove the assist handle
(B).
|
|
2. |
Installation is the reverse of removal.
|
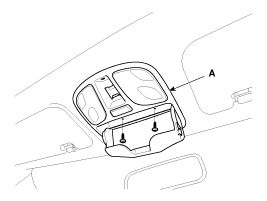
Overhead Console Lamp Replacement
| •
|
When prying with a flat-tip screwdriver, wrap it with
protective tape to prevent damage.
|
| •
|
Put on gloves to protect your hands.
|
|
|
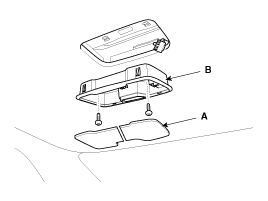
1. |
After loosening the mounting screws, remove the overhead console
(A).
|
|
2. |
Disconnect the connectors (B).
|
|
3. |
Installation is the reverse of removal.
|
Room Lamp Replacement
| •
|
When prying with a flat-tip screwdriver, wrap it with
protective tape to prevent damage.
|
| •
|
Put on gloves to protect your hands.
|
|
|
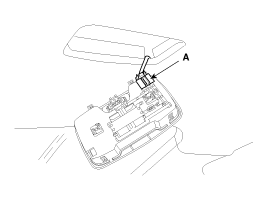
1. |
Remove the covers (A).
|
|
2. |
After loosening the mounting screws, then remove the room lamp
(B).
|
|
3. |
Disconnect the connector (A).
|
|
4. |
Installation is the reverse of removal.
|
Hends Free Mic and Lamp Replacement
|
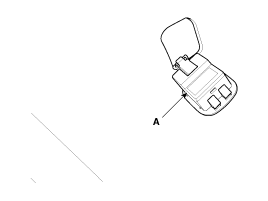
1. |
Remove the hands free mic (A) and lamp (B).
|
|
2. |
Installation is the reverse of removal.
|
Roof Trim Replacement
| •
|
Put on gloves to protect your hands.
|
| •
|
When prying with a flat-tip screwdriver, wrap it with
protective tape to prevent damage.
|
| •
|
Take care not to bend or scratch the trim and panels.
|
|
|
1. |
Remove the following items :
| A. |
Rear seat cushion
(Refer to the BD group - "Rear Seat")
|
| B. |
Front door scuff trim & Rear door scuff trim
(Refer to the BD group - "Interior Trim")
|
| C. |
Front pillar trim
(Refer to the BD group - "Interior Trim")
|
| D. |
Center pillar lower trim & Center pillar upper trim
(Refer to the BD group - "Interior Trim")
|
| E. |
Rear pillar trim
(Refer to the BD group - "Interior Trim")
|
|
|
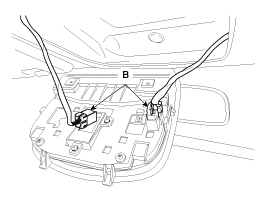
2. |
Disconnect the connector (A).
[Driver's]
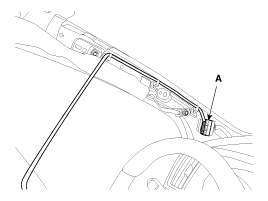
[Passenger's]
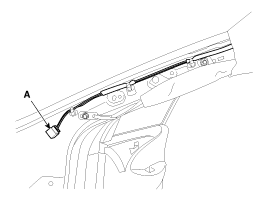
|
|
4. |
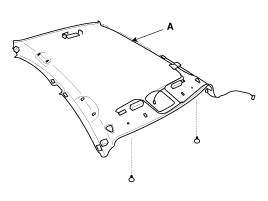
Remove the roof trim (A).
|
|
5. |
Installation is the reverse of removal.
|
• |
Replace any damage clips.
|
|
|
Components
1. Roof trim
2. Sunvisor
3. Retainer
4. Assist handle bracket
...
Components
1. Front pillar trim
2. Center pillar upper trim
3. Center pillar lower trim
4. Rear pillar trim
5. Cowl side trim
6. Front door scuff trim
7. ...
See also:
Driving in the rain
Rain and wet roads can make driving dangerous, especially if you’re not prepared
for the slick pavement. Here are a few things to consider when driving in the rain:
A heavy rainfall will make ...
General Information
General Information
The supplemental restraint system (SRS) is designed to supplement the
seat belt to help reduce the risk or severity of injury to the driver and passenger
by activating an ...
Anchor Pretensioner (APT). Components and Components Location
Components
...
 Hyundai Sonata: Roof Trim. Repair procedures
 Roof Trim. Components and Components Location
 Interior Trim. Components and Components Location