 Hyundai Sonata: AVN Head Unit. Repair procedures
Removal
AVN Head Unit
|
| 1. |
Disconnect the negative (-) battery terminal.
|
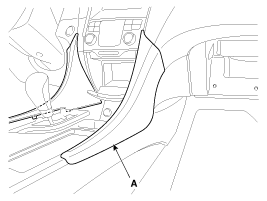
| 2. |
Remove the crash pad garnish (A).
|
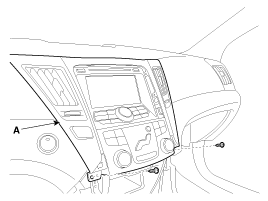
| 3. |
Remove the crash pad center fascia panel (A), after loosening
the mounting screws.
|
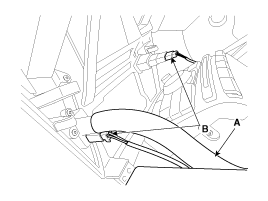
| 4. |
Disconnect the center fascia panel connectors (B), after removing
the air condition hose (A) from the upper side of center fascia panel.
|
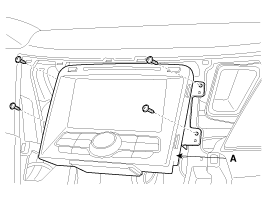
| 5. |
Remove the mounting screws then remove the AVN head unit (A).
|
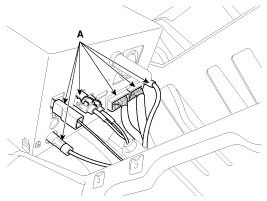
| 6. |
Remove the AVN head unit connectors and cables (A).
|
Roof Antenna (GPS + XM)
| 1. |
Remove the rear roof trim.
(Refer to the BD group - "Roof trim")
|
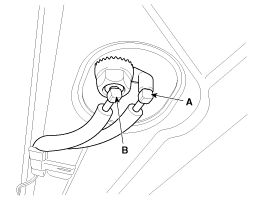
| 2. |
Disconnect the GPS (B) cable and XM cable (A) from the roof antenna.
|
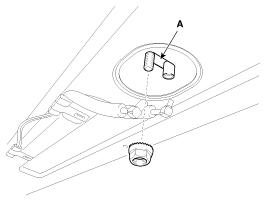
| 3. |
Remove the roof antenna (A) after removing a nut
|
Installation
AVN Head Unit
| 1. |
Connect the AVN head unit connectors and cable.
|
| 2. |
Install the AVN head unit.
|
| 3. |
Install the crash pad center fascia panel.
|
| 4. |
Install the crash pad garnish.
|
| 5. |
Check the audio system.
|
Roof Antenna (GPS + XM)
| 1. |
Installation the roof antenna.
|
| 2. |
Connect the GPS cable and XM cable.
|
| 3. |
Install the rear roof trim.
|
 AVN Head Unit. Components and Components Location
Components
AVN (A/V & Navigation) Head Unit Connector
Pin No.
Connector A
Connector B
Description
Remarks
...
 Multimedia Jack. Schematic Diagrams
Circuit Diagram
...
See also:
Exhaust Manifold. Components and Components Location
Components
[ULEV]
1. Heat protector
2. Exhaust manifold
3. Exhaust manifold gasket
4. Exhaust manifold stay
[SULEV]
1. Heat protec ...
MENU : iPod
In iPod mode, press the key to
set the Repeat, Album Random, All Random, and Information features.
Repeat
Press the key Set [1 RPT] through
the TUNE knob or
key to repeat the current song. ...
Description and Operation
OBD-II review
1. Overview
The California Air Resources Board (CARB) began regulation of On Board
Diagnostics (OBD) for vehicles sold in California beginning with the 1988 model
year. The ...
