 Hyundai Sonata: Front Strut Assembly. Repair procedures - Revised
Replacement
| 1. |
Remove the front wheel & tire.
|
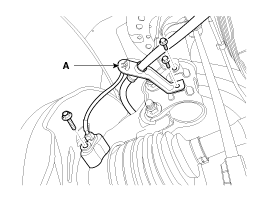
| 2. |
Remove the brake hose (A) & wheel speed sensor bracket (B) from
the front strut assembly by loosening mounting bolts.
|
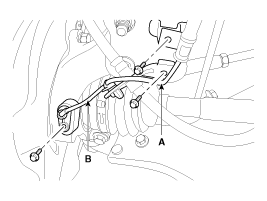
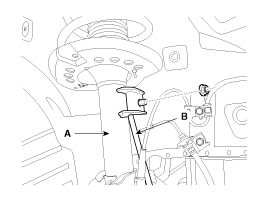
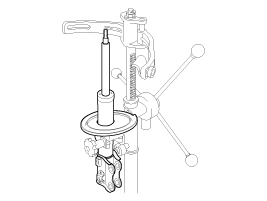
| 3. |
Disconnect the stabilizer link (B) with the front strut assembly
(A) after loosening the nut.
|
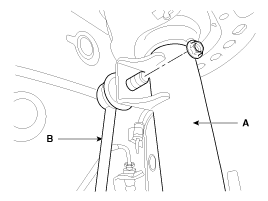
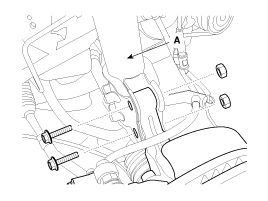
| 4. |
Disconnect the front strut assembly (A) with the knuckle by loosening
the bolt & nut.
|
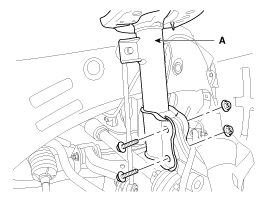
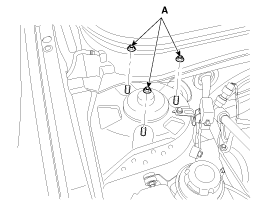
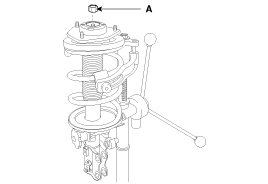
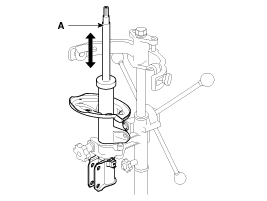
| 5. |
Remove the front strut assembly and then loosen the strut mounting
nuts (A).
|
| 6. |
Installation is the reverse of removal.
|
Replacement
| 1. |
Remove the front wheel & tire.
|
| 2. |
Remove the brake hose (A) & wheel speed sensor bracket (B) from
the front strut assembly by loosening mounting bolts.
|
| 3. |
Disconnect the stabilizer link (B) with the front strut assembly
(A) after loosening the nut.
|
| 4. |
Disconnect the front strut assembly (A) with the knuckle by loosening
the bolt & nut.
|
| 5. |
Remove the front strut assembly and then loosen the strut mounting
nuts (A).
|
| 6. |
Installation is the reverse of removal.
|
Disassembly
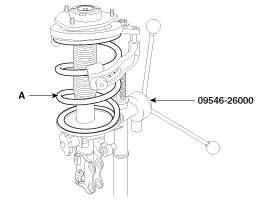
| 1. |
Compress the coil spring with a SST(09546-26000).
Do not compress the spring more than necessary.
|
| 2. |
Loosen the self locking nuts (A).
|
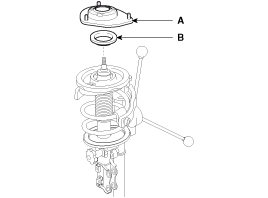
| 3. |
Remove the insulator assembly (A) and the strut bearing (B).
|
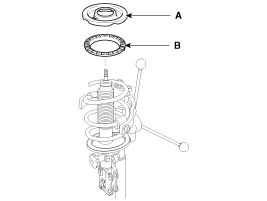
| 4. |
Remove the spring upper seat (A) and pad (B).
|
| 5. |
Remove the dust cover (A) and the bumper rubber (B).
|

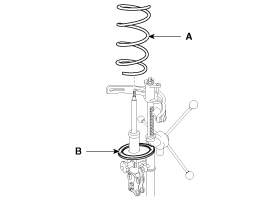
| 6. |
Remove the coil spring (A) and the spring lower pad (B).
|
| 7. |
Remove the shock absorber (A) from the specialtool.
|
| 8. |
Reassembly is the reverse of the disassembly.
|
Inspection
| 1. |
Check the strut bearing for wear and damage.
|
| 2. |
Check the spring upper and lower seat for damage and deterioration.
|
| 3. |
Compress and extend the piston rod (A) and check that there is
no abnormal resistance or unusual sound during operation.
|
 Front Strut Assembly. Components and Components Location
Components
1. Insulator cap
2. Insulator assembly
3. Strut bearing
4. Spring upper seat
5. Spring upper pad
6. Coil spring
7. Spring lower pad
8. Dust ...
 Front Lower Arm. Repair procedures - Revised
Replacement
1.
Remove the front wheel & tire.
Tightening torque:
88.3 ~ 107.9 N.m (9.0 ~ 11.0 kgf.m, 65.1 ~ 79.6 lb-ft)
...
See also:
Front Stabilizer Bar. Repair procedures - Revised
Replacement
1.
Remove the front wheel & tire.
Tightening torque:
88.3 ~ 107.9 N.m (9.0 ~ 11.0 kgf.m, 65.1 ~ 79.6 lb-ft)
...
Multimedia jack. Repair procedures
Removal
1.
Remove the shift lever knob.
(Refer to the BD group - "Console")
2.
Remove the console upper cover (A).
...
Winter driving
More severe weather conditions of winter result in greater wear and other problems.
To minimize winter driving problem, you should follow these suggestions:
Snowy or icy conditions
To drive yo ...
