 Hyundai Sonata: Headlight, position light, turn signal light, side marker light and front fog
light bulb replacement
Hyundai Sonata: Headlight, position light, turn signal light, side marker light and front fog
light bulb replacement

(1) Headlight (High)
(2) Headlight (Low)
(3) Front turn signal light / Position light
(4) Front fog light (if equipped)
Headlight bulb
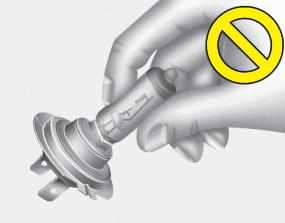
WARNING - Halogen bulbs
- Halogen bulbs contain pressurized gas that will produce flying pieces of glass if broken.
- Always handle them carefully, and avoid scratches and abrasions. If the bulbs are lit, avoid contact with liquids. Never touch the glass with bare hands. Residual oil may cause the bulb to overheat and burst when lit. A bulb should be operated only when installed in a headlight.
- If a bulb becomes damaged or cracked, replace it immediately and carefully dispose of it.
- Wear eye protection when changing a bulb. Allow the bulb to cool down before handling it.
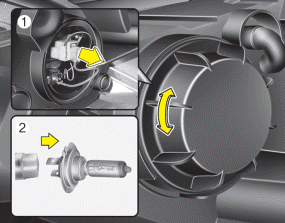
1. Open the hood.
2. Remove the headlight bulb cover by turning it counterclockwise.
3. Disconnect the headlight bulb socketconnector.
4. Unsnap the headlight bulb retaining wire by depressing the end and pushing it
upward.
5. Remove the bulb from the headlight assembly.
6. Install a new headlight bulb and snap the headlight bulb retaining wire into
position by aligning the wire with the groove on the bulb.
7. Connect the headlight bulb socketconnector.
8. Install the headlight bulb cover by turning it clockwise.
✽ NOTICE
If the headlight aiming adjustment is necessary after the headlight assembly is reinstalled, consult an authorized HYUNDAI dealer.
Front turn signal, position, side marker and fog light bulbs (if equipped)
If the light bulb is not operating, have the vehicle checked by an authorized HYUNDAI dealer.
 Light bulbs
WARNING - Working on the lights
Prior to working on the light, firmly apply the parking brake, ensure that
the ignition switch is turned to the LOCK position and turn off the lights to avoid
sudd ...
 Side repeater light bulb replacement
If the light bulb is not operating, have the vehicle checked by an authorized
HYUNDAI dealer. ...
See also:
Satellite radio reception
You may experience difficulties in receiving XM™ satellite radio signals in the
following situations.
If you are driving in a tunnel or a covered parking area.
If you are driving beneath t ...
Theft-alarm system
This system is designed to provide protection from unauthorized entry into the
vehicle. This system is operated in three stages: the first is the "Armed" stage,
the second is the " ...
Defroster
CAUTION
To prevent damage to the conductors bonded to the inside surface of the rear
window, never use sharp instruments or window cleaners containing abrasives to clean
the window.
✽ NOT ...
