 Hyundai Sonata: Rear Assist Arm. Repair procedures
Replacement
| 1. |
Remove the rear wheel & tire.
|
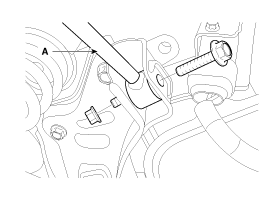
| 2. |
Remove the split pin and castle nut and then disconnect the rear
assist arm (A) from the rear axle.
|
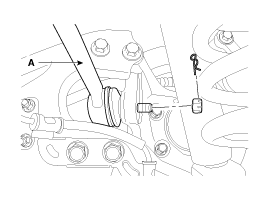
| 3. |
Loosen the bolt & nut and then remove the rear assist arm (A)
with the sub frame.
|
| 4. |
Installation is the reverse of removal.
|
| 5. |
Check the alignment.
(Refer to 'Tires/Wheels - alingment')
|
Inspection
| 1. |
Check the bushing for wear and deterioration.
|
| 2. |
Check for all bolts and nut.
|
 Rear Stabilizer Bar. Repair procedures
Replacement
1.
Remove the rear wheel & tire.
Tightening torque:
88.3 ~ 107.9 N.m (9.0 ~ 11.0 kgf.m, 65.1 ~ 79.6 lb-ft)
...
 Trailing Arm. Repair procedures
Replacement
1.
Remove the rear wheel & tire.
Tightening torque:
88.3 ~ 107.9 N.m (9.0 ~ 11.0 kgf.m, 65.1 ~ 79.6 lb-ft)
...
See also:
Inside rearview mirror
Adjust the rearview mirror so that the center view through the rear window is
seen. Make this adjustment before you start driving.
WARNING - Rear visibility
Do not place objects in the rear seat o ...
Brake Pedal. Repair procedures
Removal
1.
Remove the crash pad lower panel. (Refer to the Body group- crash
pad).
2.
Pull down steering column shaft after removing bolts ...
Battery. Repair procedures
Removal and Installation
1.
Disconnect the terminals from the battery.
Tightening torque :
(+) terminal (A) : 7.8 ~ 9.8N.m (0.8 ~ 1.0kgf. ...
