 Hyundai Sonata: Smart key unit. Repair procedures
Inspection
Smart Key Unit
| - |
Refer to the BE group - inspection / self diagnosis with GDS.
|
Smart Key Switch
| - |
Refer to the BE group - inspection / self diagnosis with GDS.
|
Antenna
| - |
Refer to the BE group - inspection / self diagnosis with GDS.
|
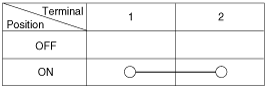
Trunk Lid Open Switch
| 1. |
Check for continuity between the Trunk lid open switch terminals.
|
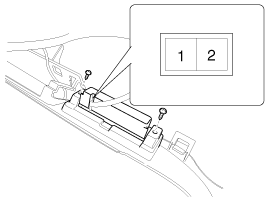
| 2. |
If continuity is not specified, inspect the switch
|
Removal
|
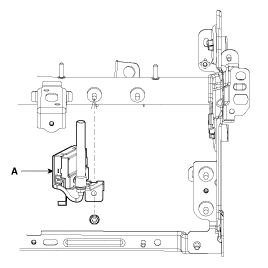
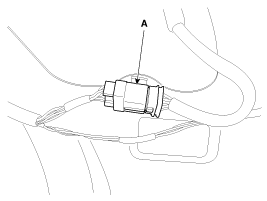
Smart key unit
| 1. |
Disconnect the negative(-) battery terminal.
|
| 2. |
Remove the glove box.
(Refer to the BD group - "Crash pad")
|
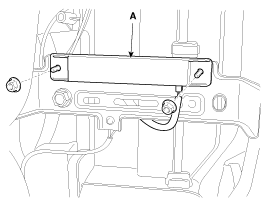
| 3. |
Remove the smart key unit (A) after disconnecting the connector
and releasing the locks (B) from both sides of the bracket.
If necessary of removing it with bracket(C), remove the smart
key unit with bracket after loosening the mounting nuts (2EA) and screw
(1EA) mounted inside.
|
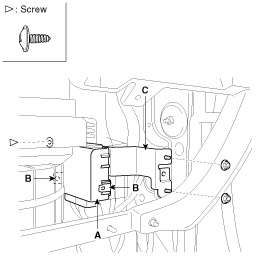
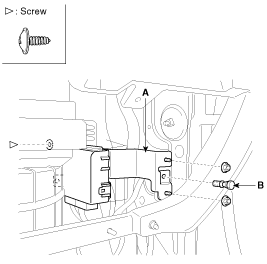
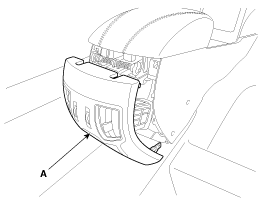
| 4. |
In case of Canada, remove the smart key unit with bracket (A)
after loosening the mounting nuts, screws and shear bolt (B).
|
RF Receiver
|
| 1. |
Disconnect the negative(-) battery terminal.
|
| 2. |
Remove the glove box.
(Refer to the BD group - "Crash pad")
|
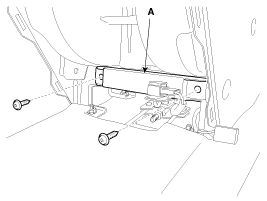
| 3. |
Remove the RF receiver (A) after loosening the mounting nuts (2EA)
and disconnecting the connector.
|
Interior 1 Antenna
| 1. |
Disconnect the negative(-) battery terminal.
|
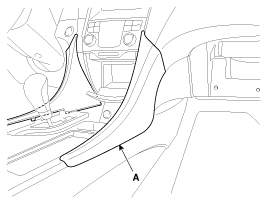
| 2. |
Remove the crash pad garnish (A).
|
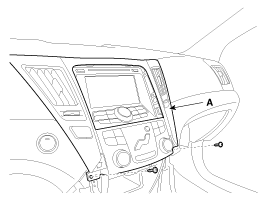
| 3. |
Remove the center fascia panel (A) after loosening the mounting
screws.
|
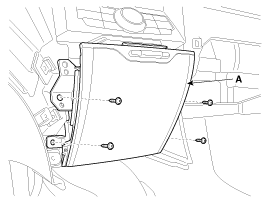
| 4. |
Remove the crash pad center lower tray (A) after loosening the
mounting screws.
|
| 5. |
Remove the interior 1 antenna (A) after disconnecting the connector
and loosening the mounting nuts (2EA).
|
Interior 2 Antenna
| 1. |
Disconnect the negative(-) battery terminal.
|
| 2. |
Remove the center console rear cover (A).
|
| 3. |
Disconnect the interior 2 antenna connector located at the console
rear side, then remove the interior 2 antenna (A) after loosening screws
(2EA).
|
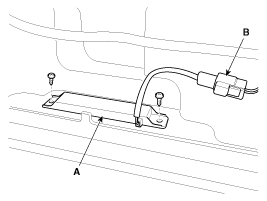
Trunk Antenna
| 1. |
Disconnect the negative(-) battery terminal.
|
| 2. |
Remove the trunk transverse trim.
(Refer to the BD group - "Interior trim")
|
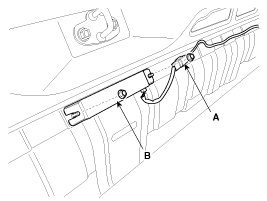
| 3. |
Disconnect the trunk antenna connector (A) and remove the trunk
antenna (B) after loosening nut (2EA).
|
Exterior Bumper Antenna
| 1. |
Disconnect the negative(-) battery terminal.
|
| 2. |
Remove the rear bumper.
(Refer to the BD group - "Rear bumper")
|
| 3. |
Disconnect the antenna connector (B) and remove the exterior bumper
antenna (A) after loosening the screws (2EA).
|
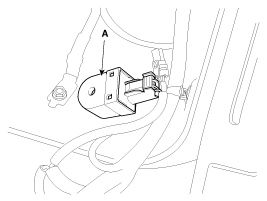
Buzzer
| 1. |
Disconnect the negative(-) battery terminal.
|
| 2. |
Remove the left side wheel guard.
|
| 3. |
Remove the external buzzer (A) after disconnecting the connector.
|
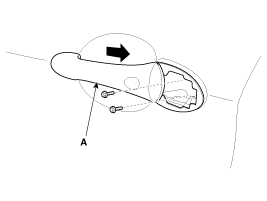
Door Outside Handle
| 1. |
Disconnect the negative (-) battery terminal.
|
| 2. |
Disconnect the connector after removing the door trim. (Refer
to the BD group - "Front door")
|
| 3. |
Loosen the mounting bolt, then remove the door handle cover and
door lock (A).
|

| 4. |
Remove the outside handle (A) by sliding it rearward.
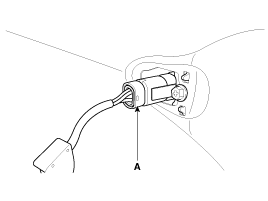
|
| 5. |
Disconnect the door outside handle connector (A).
|
Trunk lid open switch
| 1. |
Disconnect the negative(-) battery terminal.
|
| 2. |
Remove the trunk door trim.
(Refer to the BD group - "Trunk")
|
| 3. |
Remove the trunk lid panel after disconnecting the connector and
loosening the mounting screws.
(Refer to the BD group - "Trunk lid")
|
| 4. |
Disconnect the trunk lid open switch connector (A).
|
| 5. |
Remove the outside handle (A) from the trunk garnish after loosening
the trunk outside handle mounting screws.
|

Installation
Smart Key Unit
| 1. |
Install the smart key unit.
|
| 2. |
Install the smart key unit mounting nuts and screw and connector.
|
| 3. |
Install the glove box housing.
|
| 4. |
Install the glove box.
|
| 5. |
Install the negative (-) battery terminal and check the smart
key system.
|
RF Receiver
| 1. |
Install the RF receiver.
|
| 2. |
Install the glove box housing.
|
| 3. |
Install the glove box.
|
| 4. |
Install the negative (-) battery terminal and check the smart
key system.
|
Interior 1 Antenna
| 1. |
Install the interior 1 antenna.
|
| 2. |
Install the crash pad center lower tray.
|
| 3. |
Install the center fascia penel.
|
| 4. |
Install the crash pad garnish.
|
| 5. |
Install the negative (-) battery terminal and check the smart
key system.
|
Interior 2 Antenna
| 1. |
Install the interior 2 antenna.
|
| 2. |
Install the console rear cover after connecting the connector.
|
| 3. |
Install the negative (-) battery terminal and check the smart
key system.
|
Trunk Antenna
| 1. |
Install the trunk antenna.
|
| 2. |
Install the trunk tranverse trim.
|
| 3. |
Install the negative (-) battery terminal and check the smart
key system.
|
Exterior Bumper Antenna
| 1. |
Install the exterior bumper antenna.
|
| 2. |
Install the rear bumper.
|
| 3. |
Install the negative (-) battery terminal and check the smart
key system.
|
Buzzer
| 1. |
Install the buzzer.
|
| 2. |
Install the left side wheel guard.
|
| 3. |
Install the negative (-) battery terminal and check the smart
key system.
|
Trunk Lid Open Switch
| 1. |
Install the trunk lid outside handle.
|
| 2. |
Install the trunk lid panel.
|
| 3. |
Install the trunk door trim.
|
| 4. |
Install the negative (-) battery terminal and check the smart
key system.
|
Door Outside Handle
| 1. |
Install the outside handle.
|
| 2. |
Install the door trim.
|
| 3. |
Install the negative (-) battery terminal and check the smart
key system.
|
 Smart key unit. Schematic Diagrams
Circuit Diagram
...

See also:
Sunroof. Repair procedures
Replacement
Glass Replacement
-
Put on glove to protect your hands.
...
Schematic Diagrams
System Block Diagram
...
Anchor Pretensioner (APT). Description and Operation
Description
Front seat belt anchor pretensioner operates as well as belt pretensioner
at the same time If it gets into its deploy condition after a collision. It
is located at near anchor on ...
