 Hyundai Sonata: Wiper blades
Blade inspection
✽ NOTICE
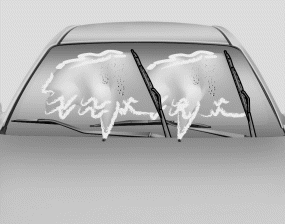
Commercial hot waxes applied by automatic car washes have been known to make the windshield difficult to clean.
Contamination of either the windshield or the wiper blades with foreign matter can reduce the effectiveness of the windshield wipers. Common sources of contamination are insects, tree sap, and hot wax treatments used by some commercial car washes. If the blades are not wiping properly, clean both the window and the blades with a good cleaner or mild detergent, and rinse thoroughly with clean water.
CAUTION
To prevent damage to the wiper blades, do not use gasoline, kerosene, paint thinner, or other solvents on or near them.
Blade replacement
When the wipers no longer clean adequately, the blades may be worn or cracked, and require replacement.
CAUTION
To prevent damage to the wiper arms or other components, do not attempt to move the wipers manually.
CAUTION
The use of a non-specified wiper blade could result in wiper malfunction and failure.
Front windshield wiper blade
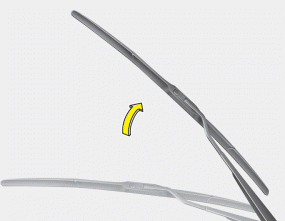
1. Raise the wiper arm.
CAUTION
Do not allow the wiper arm to fall against the windshield, since it may chip or crack the windshield.
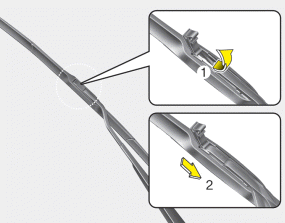
2. Lift up the wiper blade clip. Then pull down the blade assembly and remove it.
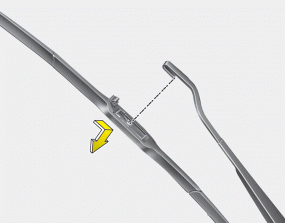
3. Install the new blade assembly in the reverse order of removal.
 Climate control air filter
Filter inspection
The climate control air filter should be replaced according to the Maintenance
Schedule. If the vehicle is operated in severely air-polluted cities or on dusty
rough roads for a ...
 Battery
...
See also:
License plate light bulb replacement
1. Loosen the retaining screws with a philips head screwdriver.
2. Remove the soket by turning it connterclockwise.
3. Remove the bulb by pulling it straight out.
4. Install a new bulb.
5. Rei ...
Instrument Cluster. Repair procedures
Inspection
Speedometer
1.
Adjust the pressure of the tires to the specified level.
2.
Drive the vehicle onto a speedometer tester. Use whee ...
Hands Free Switch. Schematic Diagrams
Circuit Diagram
...
