Hyundai Sonata: Cylinder Block. Repair procedures - Cylinder Block - Engine Mechanical SystemHyundai Sonata: Cylinder Block. Repair procedures

Disassembly

•
Use fender covers to avoid damaging painted surfaces.
•
To avoid damage, unplug the wiring connectors carefully while holding the connector portion.
•
Mark all wiring and hoses to avoid misconnection.
•
Turn the crankshaft pulley so that the No.1 piston is at top dead center.
•
Engine removal is required for this procedure.
In case of removing the high pressure fuel pump, high pressure fuel pipe, delivery pipe, and injector, there may be injury caused by leakage of the high pressure fuel. So don’t do any repair work right after engine stops.
1.
Remove the engine assembly from the vehicle. (Refer to Engine and transaxle assembly in this group)
2.
Install the engine to an engine stand for disassembly.
3.
Remove the intake manifold and exhaust manifold. (Refer to Intake and exhaust system in this group)
4.
Remove the timing chain. (Refer to Timing system in this group)
5.
Remove the (Refer to Cylinder head in this group)
6.
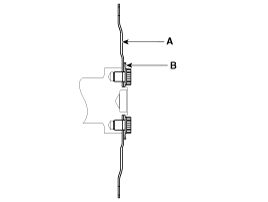
AT : Remove the drive plate (A) and the adapter plate (B).

MT : Remove the flywheel.
7.
Remove the balance shaft & oil pump assembly.
(Refer to Lubrication system in this group)
8.
Remove the A/C compressor.
(Refer to HA group)
9.
Remove the alternator.
(Refer to EE group)
10.
Remove the water pump assembly.
(Refer to Cooling system in this group)
11.
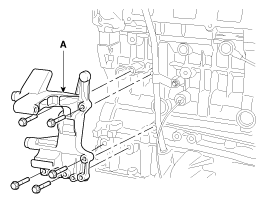
Remove the tensioner assembly integrated bracket (A).

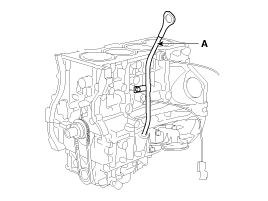
12.
Remove the oil level gauge tube (A).

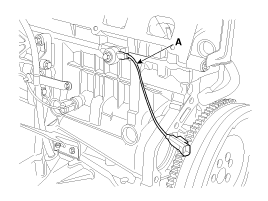
13.
Remove the knock sensor (A).

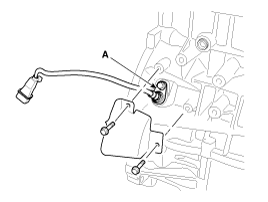
14.
Remove the oil pressure sensor (A).

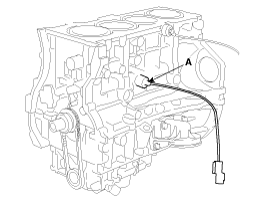
15.
Remove the CKPS (Crankshaft position sensor) (A).

16.
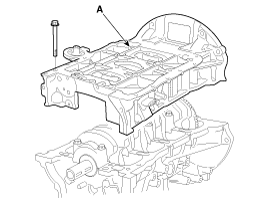
Remove the ladder frame (A).

17.
Check the connecting rod end play.
18.
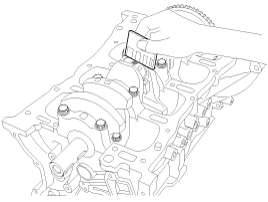
Remove the connecting rod caps and check oil clearance.
19.
Remove piston and connecting rod assemblies.
(1)
Using a ridge reamer, remove all the carbon from the top of the cylinder.
(2)
Push the piston, connecting rod assembly and upper bearing through the top of the cylinder block.
•
Keep the bearings, connecting rod and cap together.
•
Arrange the piston and connecting rod assemblies in the correct order.
20.
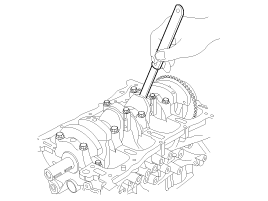
Remove crankshaft bearing cap and check oil clearance.
21.
Check the crankshaft end play.
22.
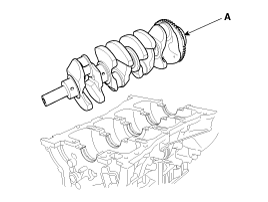
Lift the crankshaft (A) out of the engine, being careful not to damage journals.

Arrange the main bearings and thrust bearings in the correct order.
23.
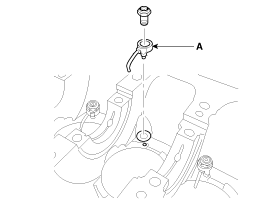
Remove the oil jet (A).

24.
Check fit between piston and piston pin.
Try to move the piston back and forth on the piston pin. If any movement is felt, replace the piston and pin as a set.
25.
Remove piston rings.
(1)
Using a piston ring expander, remove the 2 compression rings.
(2)
Remove oil ring.
Arrange the piston rings in the correct order only.
26.
Disconnect connecting rod from piston.

Inspection

Connecting Rod
1.
Check the connecting rod end play.
Using a feeler gauge, measure the end play while moving the connecting rod back and forth.

End play :
Standard : 0.10~ 0.25mm (0.0039 ~ 0.0098in.)
Limit : 0.35mm (0.0138in.)

A.
If out-of-tolerance, install a new connecting rod.
B.
If still out-of-tolerance, replace the crankshaft.
2.
Check the connecting road bearing oil clearance.
(1)
Check the matchmarks on the connecting rod and cap are aligned to ensure correct reassembly.
(2)
Remove 2 connecting rod cap bolts.
(3)
Remove the connecting rod cap and bearing half.
(4)
Clean the crank pin and bearing.
(5)
Place plastigage across the crank pin.
(6)
Reinstall the bearing half and cap, and torque the bolts.

Tightening torque
17.7~21.6Nm (1.8~2.2kgf.m, 13.0~15.9lb-ft) + 88~92°

Do not turn the crankshaft.
(7)
Remove 2 bolts, connecting rod cap and bearing half.
(8)
Measure the plastigage at its widest point.

Standard oil clearance
0.031 ~ 0.045mm (0.00122 ~ 0.00177in.)

(9)
If the plastigage measures too wide or too narrow, remove the upper half of the bearing, install a new, complete bearing with the same color mark (select the color as shown in the next column), and recheck the clearance.
Do not file, shim, or scrape the bearings or the caps to adjust clearance.
(10)
If the plastigage shows the clearance is still incorrect, try the next larger or smaller bearing (the color listed above or below that one), and check clearance again.
If the proper clearance cannot be obtained by using the appropriate larger or smaller bearings, replace the crankshaft and start over.
If the marks are indecipherable because of an accumulation of dirt and dust, do not scrub them with a wire brush or scraper. Clean them only with solvent or detergent.
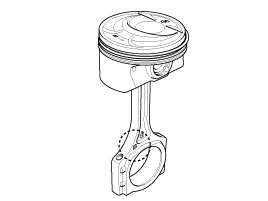
Connecting Rod Identification Mark

Connecting Rod Specifications
Class
Mark
Inside Diameter
a
A
51.000 ~ 51.006mm
(2.00787 ~ 2.00811in.)
b
B
51.006 ~ 51.012mm
(2.00811 ~ 2.00834in.)
c
C
51.012 ~ 51.018mm
(2.00834 ~ 2.00858in.)

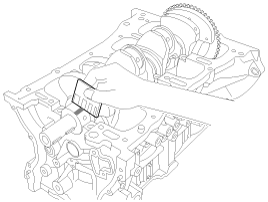
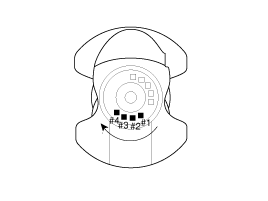
Crankshaft Pin Identification Mark

Conform to read stamping order as shown arrow direction from #1.
Crankshaft Specifications
Class
Mark
Outside Diameter Of Pin
I
1
47.966 ~ 47.972mm
(1.88842 ~ 1.88866in.)
II
2
47.960 ~ 47.966mm
(1.88819 ~ 1.88842in.)
III
3
47.954 ~ 47.960mm
(1.88795 ~ 1.88819in.)

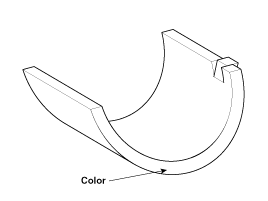
Connecting Rod Bearing Identification Mark

Connecting Rod Bearing Specifications
Class
Mark
Thickness Of Bearing
AA
Blue
1.515 ~ 1.518mm
(0.05965 ~ 0.05976in.)
A
Black
1.512 ~ 1.515mm
(0.05953 ~ 0.05965in.)
B
None
1.509 ~ 1.512mm
(0.05941 ~ 0.05953in.)
C
Green
1.506 ~ 1.509mm
(0.05929 ~ 0.05941in.)
D
Yellow
1.503 ~ 1.506mm
(0.05917 ~ 0.05929in.)

Selection Chart For Connecting Rod Bearings
Crankshaft Indentification Mark
Connecting Rod Identification Mark
Assembing Classification Of Bearing
I (1)
a (A)
D (Yellow)
b (B)
C (Green)
c (C)
B (None)
II (2)
a (A)
C (Green)
b (B)
B (None)
c (C)
A (Black)
III (3)
a (A)
B (None)
b (B)
A (Black)
c (C)
AA (Blue)

3.
Inspect the connecting rods.
(1)
When reinstalling, make sure that cylinder numbers put on the connecting rod and cap at disassembly match. When a new connecting rod is installed, make sure that the notches for holding the bearing in place are on the same side.
(2)
Replace the connecting rod if it is damaged on the thrust faces at either end. Also if step wear or a severely rough surface of the inside diameter of the small end is apparent, the rod must be replaced as well.
(3)
Using a connecting rod aligning tool, check the rod for bend and twist. If the measured value is close to the repair limit, correct the rod by a press. Any connecting rod that has been severely bent or distorted should be replaced.

Allowable bend of connecting rod :
0.05mm (0.0020 in.) or less for 100mm (3.94 in.)
Allowable twist of connecting rod :
0.10mm (0.0039 in.) or less for 100mm (3.94 in.)

Crankshaft
1.
Check the crankshaft bearing oil clearance.
(1)
To check main bearing-to-journal oil clearance, remove the main caps and bearing halves.
(2)
Clean each main journal and bearing half with a clean shop tower.
(3)
Place one strip of plastigage across each main journal.
(4)
Reinstall the bearings and caps, then torque the bolts.

Tightening torque
14.7N.m (1.5kgf.m, 10.8lb-ft) + 27.5~31.4Nm (2.8~3.2kgf.m, 20.3~23.1lb-ft) + 120~125°

Do not turn the crankshaft.
(5)
Remove the cap and bearing again, and measure the widest part of the plastigage.

Standard oil clearance
0.020 ~ 0.038mm (0.00079 ~ 0.00150in.)

(6)
If the plastigage measures too wide or too narrow, remove the upper half of the bearing, install a new, complete bearing with the same color mark (select the color as shown in the next column), and recheck the clearance.
Do not file, shim, or scrape the bearings or the caps to adjust clearance.
(7)
If the plastigage shows the clearance is still incorrect, try the next larger or smaller bearing (the color listed above or below that one), and check clearance again.
If the proper clearance cannot be obtained by using the appropriate larger or smaller bearings, replace the crankshaft and start over.
If the marks are indecipherable because of an accumulation of dirt and dust, do not scrub them with a wire brush or scraper. Clean them only with solvent or detergent.
Crankshaft Bore Identification Mark

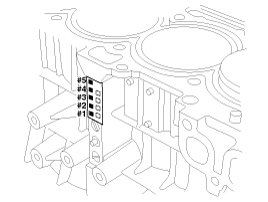
Letters have been stamped on the block as a mark for the size of each of the 5 main journal bores.
Use them, and the numbers or bar stamped on the crank (marks for main journal size), to choose the correct bearings.
Cylinder Block Specifications
Calss
Mark
Inside Diameter
a
A
56.000 ~ 56.006mm
(2.20472 ~ 2.20496in.)
b
B
56.006 ~ 56.012mm
(2.20496 ~ 2.20519in.)
c
C
56.012 ~ 56.018mm
(2.20519 ~ 2.20543in.)

Crankshaft Journal Identification Mark
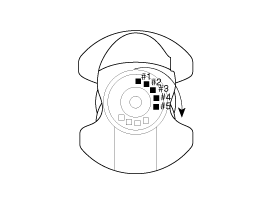
Conform to read stamping order as shown arrow direction from #1.
Crankshaft Specifications
Class
Mark
Outside Diameter Of Journal
I
1
51.954 ~ 51.960mm
(2.04543 ~ 2.04567in.)
II
2
51.948 ~ 51.954mm
(2.04519 ~ 2.04543in.)
III
3
51.942 ~ 51.948mm
(2.04496 ~ 2.04519in.)

Crankshaft Bearing Identification Mark
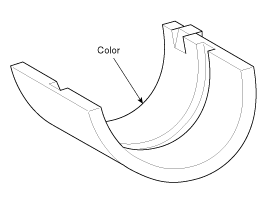
Crankshaft Bearing Specifications
Class
Mark
Thickness Of Bearing
AA
Blue
2.026 ~ 2.029mm
(0.07976 ~ 0.07988in.)
A
Black
2.023 ~ 2.026mm
(0.07965 ~ 0.07976in.)
B
None
2.020 ~ 2.023mm
(0.07953 ~ 0.07965in.)
C
Green
2.017 ~ 2.020mm
(0.07941 ~ 0.7953in.)
D
Yellow
2.014 ~ 2.017mm
(0.07929 ~ 0.07941in.)

Selection Chart For Crankshaft Bearings
Crankshaft Identification Mark
Crankshaft Bore Identification Mark
Assembling Classification Of Bearing
I (1)
a (A)
D (Yellow)
b (B)
C (Green)
Components and Components Location
Components 1. Piston ring 2. Piston 3. Connecting rod 4. Connecting rod upper bearing 5. Piston pin 6. Connecting rod lower bearing 7. Connecting rod bea ...

See also:

Schematic Diagrams
System Block Diagram ...

Special Service Tools
Special Service Tools Item Illustration Application Fuel Pressure Gauge (09353-24100) Measuring the fuel line press ...

XM radio
Using XM satellite Radio Your vehicle is equipped with a 3 month complimentary period of XM Satellite Radio. XM provides access to over 130 channels of music, information, and entertainment progr ...