 Hyundai Sonata: Balance Shaft & Oil Pump. Repair procedures
Removal
| 1. |
Remove the timing chain.
(Refer to Timing system in this group)
|
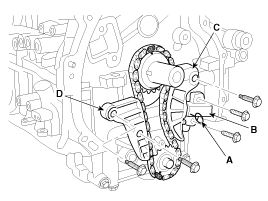
| 2. |
Install a stopper pin (A) after compressing the balance
shaft chain tensioner.
|
| 3. |
Remove the balance shaft chain hydraulic tensioner
(B).
|
| 4. |
Remove the balance shaft chain tensioner arm (C).
|
| 5. |
Remove the balance shaft chain guide (D).
|
| 6. |
Remove the balance shaft & oil pump module (A) and
balance shaft chain (B).
|

Installation
| 1. |
The key of crankshaft should be aligned with the
mating face of main bearing cap. As a result of this, the piston of
No.1 cylinder is placed at the top dead center on compression stroke.
|
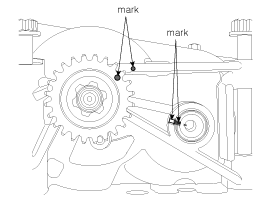
| 2. |
Confirm the balance shaft & oil pump module timing
mark.
Timing marks to be visually aligned with centers
of adjacent cast timing notches.
|
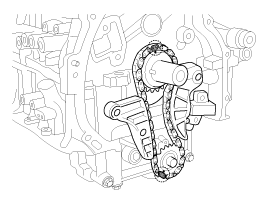
| 3. |
Install the balance shaft & oil pump module (A) with
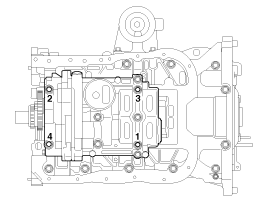
the chain (B) and sprocket.
Tightening order
|
| 4. |
Install the balance shaft chain guide (D).
|
| 5. |
Install the balance shaft chain tensioner arm (C).
|
| 6. |
Install the balance shaft chain hydraulic tensioner
(B) then remove the stopper pin (A).
|
| 7. |
Confirm the timing marks.
|
| 8. |
Install the timing chain.
(Refer to Timing system in this group)
|
 Balance Shaft & Oil Pump. Components and Components Location
Components
1. Balance shaft & oil pump assembly
2. Balance shaft chain tensioner
3. Balance shaft chain
4. Balance shaft chain sprocket
5. Balance shaft cha ...
 Oil Cooler. Repair procedures
Removal
1.
Loosen the drain plug, and drain the coolant. Remove
the radiator cap to speed draining.
2.
Disconnect the oil cooler coolant h ...
See also:
Closing the sunroof
To close the sunroof glass only
Push the sunroof control lever forward to the first detent position or pull the
lever downward.
To close the sunroof glass with the sunshade
Push the sunroof contr ...
Glove box lamp
The glove box lamp comes on when the glove box is opened.
CAUTION
To prevent unnecessary charging system drain, close the glove box securely
after using the glove box. ...
Front Strut Assembly. Repair procedures - Revised
Replacement
1.
Remove the front wheel & tire.
Tightening torque:
88.3 ~ 107.9 N.m (9.0 ~ 11.0 kgf.m, 65.1 ~ 79.6 lb-ft)
...
