
 Hyundai Sonata: Power Window Switch. Repair procedures
Inspection
Power Window Main Switch Inspection
| 1. |
Disconnect the negative (-) battery terminal.
|
| 2. |
Remove the front door trim panel.
(Refer to the BD group - "Front door")
|
| 3. |
Disconnect the connector from the switch.
|
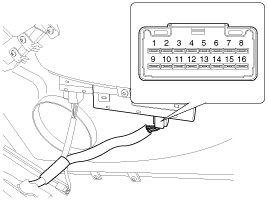
| 4. |
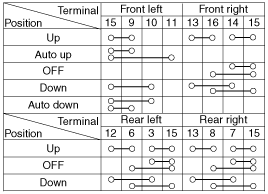
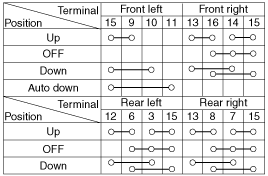
Check for continuity between the terminals in each switch position
according to the table. If the continuity condition is not normal, replace
the switch.
[Auto Up/Down]
[Auto Down Only]
|
Passenger Power Window Switch Inspection
| 1. |
Disconnect the negative (-) battery terminal.
|
| 2. |
Remove the front door trim panel.
(Refer to the BD group - "Front door")
|
| 3. |
Disconnect the connector from the switch.
|
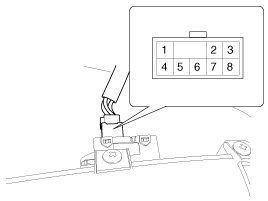
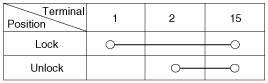
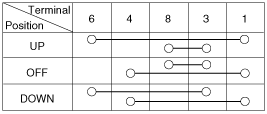
| 4. |
Check for continuity between the terminals in each switch position
according to the table. If the continuity condition is not normal, replace
the switch.
|
Rear Power Window Switch Inspection
| 1. |
Disconnect the negative (-) battery terminal.
|
| 2. |
Remove the rear door trim panel.
(Refer to the BD group - "Rear door")
|
| 3. |
Disconnect the 8P connector from the switch.
|
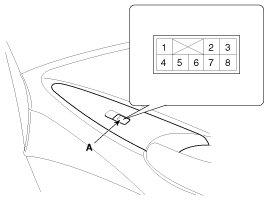
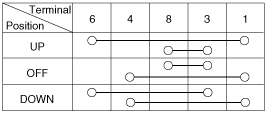
| 4. |
Check for continuity between the terminals in each switch position
according to the table. If the continuity condition is not normal, replace
the switch.
|
 Power Window Switch. Schematic Diagrams
Circuit Diagram
Driver Power Window Switch
Passenger Power Window Switch
Rear Power Window Switch
...
 Power Window Relay. Repair procedures
Inspection
1.
Disconnect the negative (-) battery terminal.
2.
Remove the junction box.
3.
Check for continuit ...
See also:
Display settings
Press the key - Select [Display]
through TUNE knob or
key Select menu through
TUNE knob
Mode Pop up
[Mode Pop up] - Changes /
selection mode
• During On state, press the or
key ...
Accelerator Pedal. Repair procedures
Removal
1.
Turn the ignition switch OFF and disconnect the negative (-) battery
cable.
2.
Disconnect the accelerator position sensor conn ...
General Information
General
1.
Basically, all measurements in this manual are taken with a tracking
gauge.
2.
When a measuring tape is used, check to be sure ...
